


Table of Contents[Hide][Show]
Tires. There are so many creative things you can do with these. If you need something fun and productive to do this weekend, while the weather is nice, then save this post!
Pin each idea you love — this roundup is packed with upcycled tire projects for every skill level, from total beginners to weekend warriors. All ideas use used tires and easy-to-find supplies.
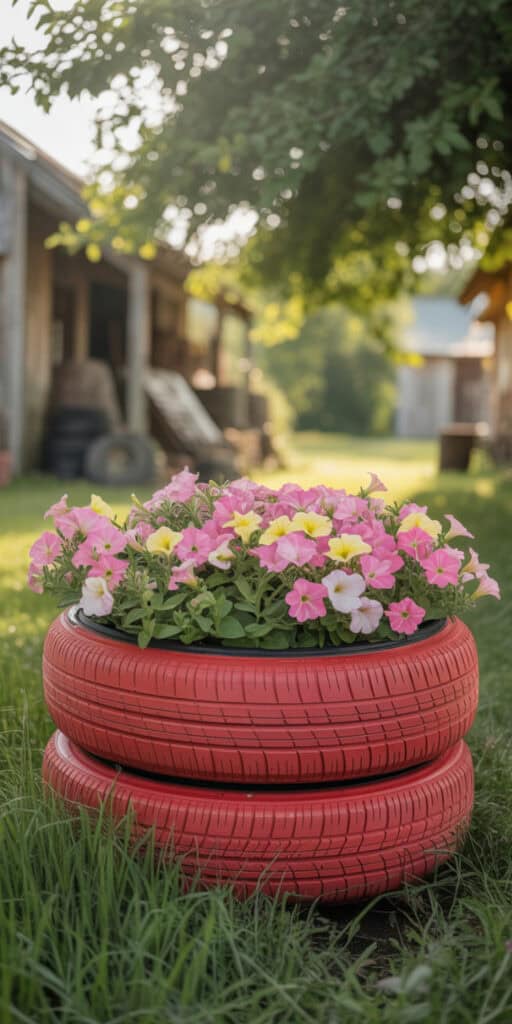
1. Painted Tire Flower Planter
This is THE classic for a reason! Clean it, paint it in a cheerful color, and plant it up with flowers or herbs. It costs nothing, literally, if you snag a free tire from your local shop. Use outdoor chalk paint for a matte look that pops in photos.
What You’ll Need:
- 2 used passenger car tires
- Outdoor chalk paint or exterior spray paint in your chosen color
- Potting soil
- Flower or herb seedlings
- Paintbrush or foam roller
- Gloves
How To Make It:
Step 1: Clean your tire thoroughly with soapy water and a scrub brush. Let it dry completely — paint won’t stick to a dirty or wet surface.
Step 2: Place the tire on a drop cloth and apply two coats of exterior paint, letting each coat dry fully between applications. Bold colors like coral, yellow, or cobalt blue look stunning.
Step 3: Once dry, place the tire in your desired spot, fill with potting soil, and plant up with annuals, herbs, or trailing vines.
Step 5: Water well and enjoy!
Frugal Tip: Most tire shops will give away old tires for free — just call ahead and ask!

2. Boho Rope-Wrapped Tire Chair
Stack two tires, wrap tightly in thick natural jute rope, add a plywood disc seat cushioned with foam and burlap fabric — and you’ve got yourself a gorgeous boho chair! This tire chair DIY is one of the most-pinned projects for good reason: it looks like a $300 boutique piece.
What You’ll Need:
- 2 matching used car tires
- 200–300 feet of thick natural jute rope (3/4 inch thickness works well)
- Strong adhesive or hot glue gun
- 1 round plywood disc cut to fit the tire diameter (most hardware stores will cut this for you)
- 2-inch foam padding, cut to match the plywood disc
- Burlap or canvas fabric for the cushion cover
- Staple gun
- Zip ties or rope to secure the two tires together
How To Make It:
Step 1: Clean both tires and stack them directly on top of each other. Secure them together with several zip ties or by lashing them tightly with rope at three or four points around the outside.
Step 2: Starting at the bottom of the stacked tires, apply a line of hot glue and begin wrapping your jute rope tightly around the outside, pressing firmly as you go. Keep rows as close together as possible with no gaps. Work your way up to the top.
Step 3: For the seat, place your foam on top of the plywood disc and wrap both together in your fabric. Pull the fabric taut underneath and staple it securely to the back of the plywood every few inches.
Step 4: Set the cushioned seat on top of the tire stack. You can glue it in place or leave it removable for easy washing.
Step 5: Optional — add a few extra rows of rope around the top edge to create a neat finished border.
Frugal Tip: Jute rope is cheapest bought in bulk on Amazon or at farm supply stores. Check Facebook Marketplace for scrap plywood and foam offcuts.
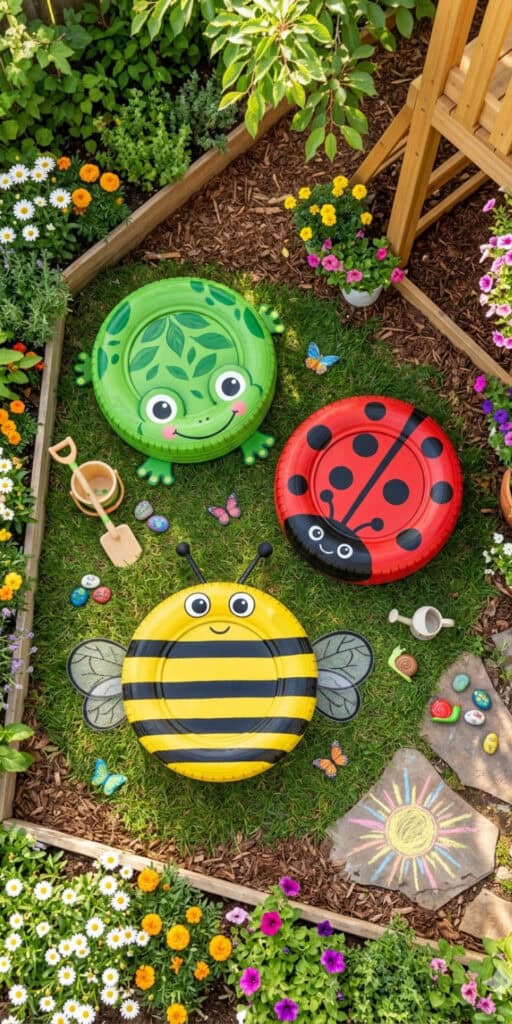
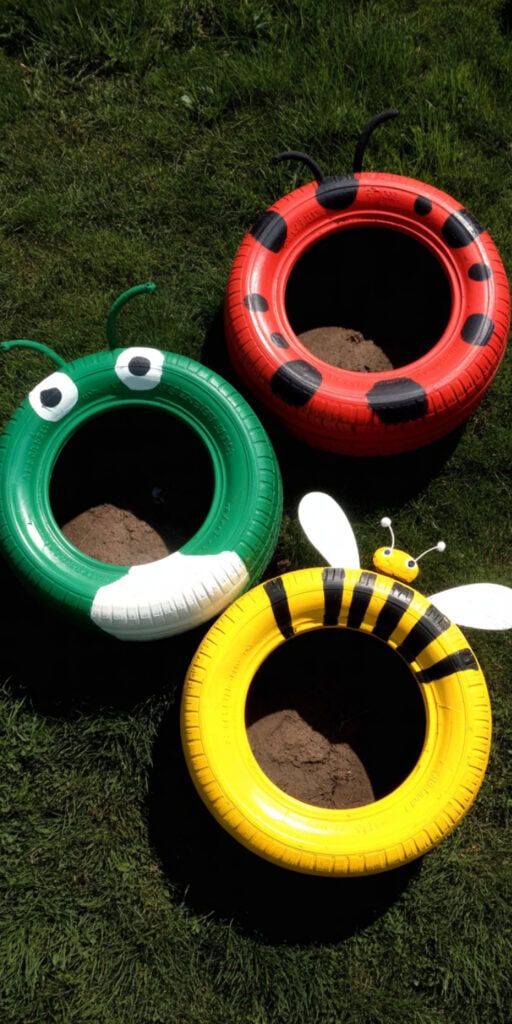
3. Tire Animal Playground Toys
Paint tires into horses, frogs, turtles, or ladybugs for an adorable backyard play area the kids will absolutely love. These used tire projects are totally free, weather-proof, and hold up for years. Seal with exterior paint and let the little ones help decorate!
What You’ll Need:
- 1 or more used car tires
- Exterior paint in multiple colors (green, red, yellow, black, white)
- Paintbrushes in various sizes
- Exterior clear coat sealer
- Chalk for sketching the design
- Concrete anchoring screws or rebar (optional, to secure tires in the ground)
How To Make It:
Step 1: Clean and dry your tires completely. Lay them flat on a drop cloth in a well-ventilated area.
Step 2: Sketch your animal design lightly in chalk on the tire surface. Simple shapes work best — big round eyes, spots, and bold colors read well from a distance. Ladybugs and frogs are the easiest starting points for beginners.
Step 3: Paint the base color first (green for a frog, red for a ladybug) and let it dry fully — about 2 hours for most exterior paints.
Step 4: Add details like eyes, spots, stripes, and mouths using smaller brushes. Black and white go a long way for adding character.
Step 5: Once completely dry, apply two coats of exterior clear sealer to protect the paint from rain, mud, and little hands.
Step 6: Position your tires in the yard. For tires that will be climbed on, partially bury the base or secure with rebar through the center for stability and safety.
Frugal Tip: Dollar store acrylic paint works fine for this project as long as you seal it well with exterior varnish afterward.

*please note the image above was modified by AI, results may vary.
4. Tire Ottoman Coffee Table
Clean a tire thoroughly, wrap the outside in chunky braided rope or faux leather, add a round wood top from a hardware store off-cut, and you have a stunning industrial-chic ottoman or side table. This tire furniture piece genuinely looks expensive and works perfectly indoors.
This one will cost a bit more because of your wood piece, but it looks gorgeous! I’d look for some barnwood, too, that would really add a uniqueness to it.
For a cheaper idea that is a tire outdoor table, check out this awesome blog post.
What You’ll Need:
- 1 clean car tire (scrubbed with degreaser and dried thoroughly)
- 100–150 feet of chunky braided rope (cotton or jute)
- Strong adhesive or hot glue gun
- 1 round plywood or MDF disc, cut to the outer diameter of the tire
- Sandpaper (120 grit)
- Wood stain or paint for the top
- Small L-brackets and screws to attach the top (optional)
How To Make It:
Step 1: Degrease the tire inside and out using dish soap and a stiff brush. This step is essential for indoor use — you don’t want oily residue on your floors. Let it dry for 24 hours.
Step 2: Sand your wood disc smooth, wipe off the dust, and apply your chosen stain or paint. Two coats with light sanding between gives the best finish. Let dry completely.
Step 3: Starting at the bottom edge of the tire, apply hot glue in small sections and press the rope firmly in place, wrapping row by row upward. Work slowly to keep rows tight and even.
Step 4: Once the outside is fully wrapped, place the wood disc on top. You can secure it with L-brackets on the underside for a permanent top, or leave it loose if you want to use the inside of the tire for hidden storage.
Step 5: Place on a rug or felt pads to protect your floors.
Frugal Tip: Ask at your local lumber yard for off-cut wood rounds — they often sell these for just a dollar or two.
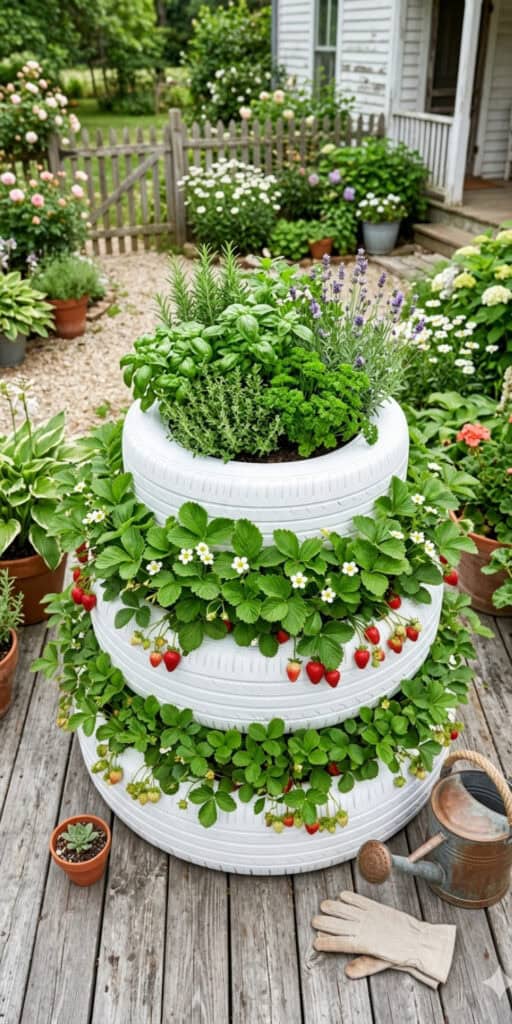
5. Stacked Tiered Vegetable Garden
Stack 2–3 tires in graduating sizes to create a raised garden bed that’s perfect for strawberries, herbs, or salad greens. This is one of the most practical used tires ideas for backyards — it drains well, warms soil faster, and keeps out creepy crawlies. Paint them white for a clean farmhouse look!
What You’ll Need:
- 2–3 tires in graduating sizes (e.g., a truck tire on the bottom, two car tires on top)
- Exterior paint in white or your chosen color
- Weed barrier fabric
- Quality potting mix or vegetable garden soil
- Seedlings or seeds of your choice
- A drill (optional, to add extra drainage holes)
How To Make It:
Step 1: Paint all your tires and let them dry completely in the sun — at least 24 hours before adding soil.
Step 2: Choose a sunny spot in your yard and place the largest tire down first. Line the inside bottom with weed barrier fabric to prevent weeds from growing up through the base.
Step 3: Fill the bottom tire about halfway with your potting mix.
Step 4: Center the next tire on top and fill it with soil to within 2 inches of the rim. Repeat with any additional tires.
Step 5: Plant your seedlings in the top tier first, then fill the outer rings of each lower tier with trailing plants like strawberries or nasturtiums that can cascade over the sides.
Step 6: Water thoroughly and add a thin layer of mulch to the top tier to retain moisture.
Frugal Tip: Mix homemade compost with bagged potting soil to stretch your budget and boost plant health at the same time.
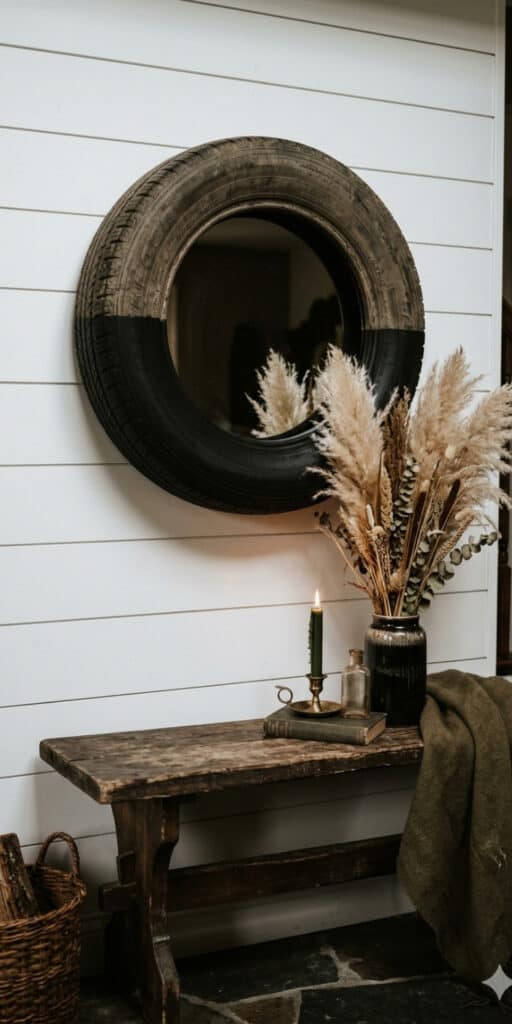

6. Tire Wall Mirror Frame
Slice a tire in half lengthwise, spray paint it gold or black, glue a round mirror to the center, and hang it on the wall. The result is honestly stunning — a sculptural mirror that looks like something from a trendy boutique. This is one of those car tire projects that stops people in their tracks.
What You’ll Need:
- 1 car tire
- A reciprocating saw or jigsaw with a blade suitable for rubber
- Matte black or gold spray paint
- A round mirror sized to fit snugly inside the tire (measure the inner diameter first)
- Strong adhesive such as E6000 or construction adhesive
- D-ring picture hangers and screws
- Safety goggles and gloves
How To Make It:
Step 1: Using your reciprocating saw, carefully cut the tire in half lengthwise so you have two equal curved sections. Wear safety goggles — rubber bits fly! Work slowly and let the blade do the work.
Step 2: In a well-ventilated area, spray paint the outer surface of one tire half with two even coats of your chosen color. Let each coat dry for 30 minutes before applying the next.
Step 3: Once fully dry, apply a generous bead of strong adhesive around the inner rim of the tire half. Press your mirror firmly into place, making sure it sits flush.
Step 4: Allow the adhesive to cure for the full time recommended on the package — usually 24 hours. Don’t rush this step.
Step 5: Attach two D-ring hangers to the back of the tire using screws, spaced to match your wall studs or a picture hanging strip.
Step 6: Hang and admire!
Frugal Tip: Check dollar stores and thrift shops for inexpensive round mirrors. You only need a basic one since the tire frame does all the talking.

7. Classic Tire Tree Swing
Drill drainage holes in the bottom of a tire, thread heavy-duty rope through, tie to a sturdy branch — childhood magic in under an hour! This is the most classic of all upcycle tire projects and kids go absolutely wild for it. Use marine-grade rope so it lasts for years.
What You’ll Need:
- 1 sturdy used car tire (no steel belts showing through)
- 15–20 feet of 3/4-inch diameter marine-grade or manila rope
- A drill with a 1/2-inch drill bit
- A sturdy tree branch at least 8 inches in diameter and free of cracks or rot
- A ladder
- Safety gloves
How To Make It:
Step 1: Before you do anything else, inspect your tree branch carefully. It needs to be healthy, thick (at least 8 inches across), and free of cracks, rot, or signs of disease. When in doubt, consult an arborist.
Step 2: Drill 4–6 drainage holes in the bottom of the tire using your drill and 1/2-inch bit. This prevents rainwater from pooling inside and becoming a mosquito breeding ground.
Step 3: Thread one end of your rope through the tire and tie it in a secure knot around the tire — a bowline knot works great here and won’t slip under load.
Step 4: Throw the other end of the rope over the branch and pull the tire up to your desired height (typically 18–24 inches off the ground for kids). Make sure the tire hangs level.
Step 5: Secure the rope to the branch using a timber hitch knot, or wrap it multiple times around the branch and tie it off securely. You can also use a purpose-made swing hanger for extra peace of mind.
Step 6: Give the swing a firm tug test before letting anyone ride it, and check the rope and knots every season for wear.
Frugal Tip: Marine rope costs more upfront but lasts years longer than standard rope in outdoor conditions — well worth it for a safety item.
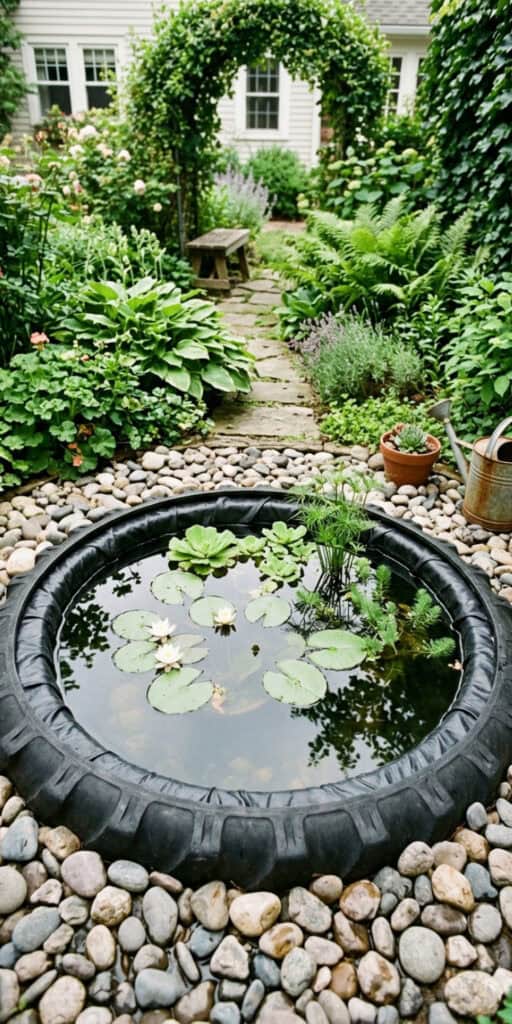
8. Tire Pond Water Feature
Bury a large truck tire halfway in the ground, line it with a pond liner, fill with water and aquatic plants. Add a small solar pump for a gentle fountain effect. This is one of those recycle tires ideas that makes people do a double-take — it looks completely intentional and beautiful.
What You’ll Need:
- 1 large truck or tractor tire
- A pond liner or heavy-duty black plastic sheeting
- A spade and wheelbarrow for digging
- River stones or decorative rocks
- Aquatic plants such as water lilies, water hyacinth, or iris
- A small solar-powered pond pump (optional)
- Aquatic soil and planting baskets for potted pond plants
How To Make It:
Step 1: Choose a spot that gets partial sun — full sun encourages algae growth. Mark out the area and dig a hole roughly half the depth of your tire.
Step 2: Place the tire into the hole so the top half sits above ground. Pack soil firmly around the outside to hold it in place and level it up.
Step 3: Line the inside of the tire with your pond liner, pressing it into the curved bottom and up the sides. Leave several inches of overlap at the top.
Step 4: Begin filling slowly with water, smoothing out the liner as the weight of the water pushes it into shape. Once full, trim any excess liner and tuck the edges under the decorative stones you’ll place around the rim.
Step 5: Arrange river stones around the top edge of the tire to disguise the liner and create a natural look.
Step 6: Add your aquatic plants in planting baskets, submerged to the appropriate depth for each variety. If using a solar pump, position it in the center and run the tubing up just above the water surface.
Step 7: Top off the water and allow it to settle for 24–48 hours before adding any fish.
Frugal Tip: Ask at farms or agricultural co-ops for old tractor tires — these are often free for the taking and make an impressively large pond feature.

9. Succulent Tire Planter Display
Paint a tire in sage green or dusty pink, fill with gritty succulent soil, and pack it with a mix of echeveria, sedum, and cacti. Lean it against a fence or wall for an instant patio focal point. Minimal watering, maximum visual impact — and it costs next to nothing!
What You’ll Need:
- 1 car tire
- Exterior spray paint in sage green, dusty pink, or terracotta
- Succulent and cactus potting mix
- A variety of succulent cuttings or small plants (echeveria, sedum, haworthia, and small cacti all work well)
- Landscape fabric or a piece of window screen
- Gravel or small pebbles for topdressing
How To Make It:
Step 1: Clean and dry your tire, then spray paint it in your chosen color. Two to three coats give the best coverage. Let dry completely.
Step 2: Stand the tire upright — either lean it against a fence or use a small wood wedge to keep it stable. Stuff a piece of landscape fabric or window screen into the bottom opening to hold the soil in while still allowing drainage.
Step 3: Fill the tire with succulent and cactus potting mix, packing it firmly so it holds its shape when the tire is standing upright. Fill right to the top.
Step 4: Using your finger or a pencil, poke planting holes across the soil surface and tuck in your succulent plants. Pack them in generously — a full, lush look works best for this style of display.
Step 5: Finish with a thin layer of fine gravel or pebbles on top to help with drainage and give a clean, polished look.
Step 6: Water lightly to settle the plants in. Succulents prefer dry conditions, so a thorough watering once every 1–2 weeks in summer and once a month in winter is plenty.
Frugal Tip: Propagate succulents from leaf cuttings for free plants — just lay fallen leaves on damp soil and tiny new plants will sprout within a few weeks.
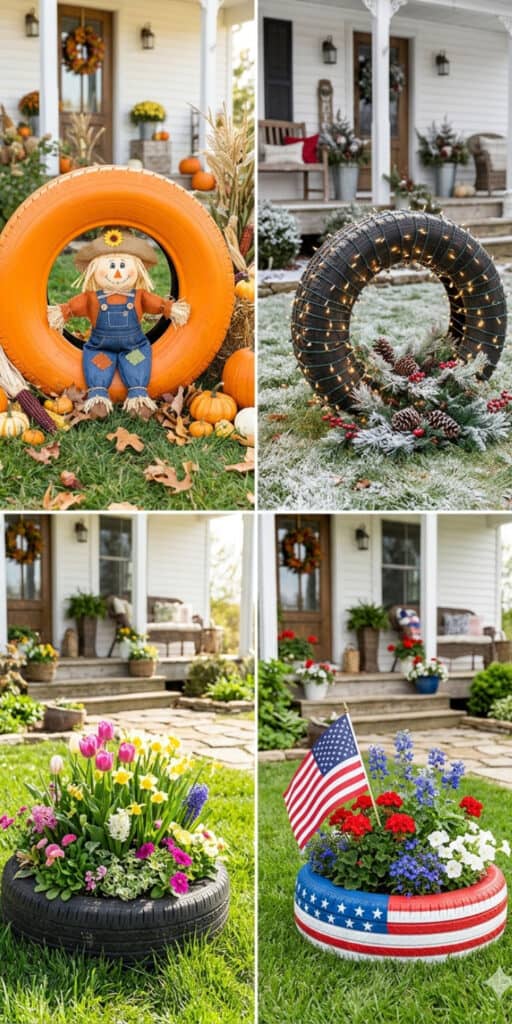
10. Seasonal Tire Decoration Display
Paint tires in seasonal colors — burnt orange and black for fall, red and green for Christmas, pastels for spring — and use them as lawn decorations or wreath bases. This is a genius tire decoration hack for frugal homesteaders: one set of tires, endless seasonal looks, zero cost after the first purchase of paint.
What You’ll Need:
- 2–4 car tires
- Exterior spray paint in seasonal colors (orange, black, red, green, pastel yellow, pastel pink)
- Seasonal decorations: faux autumn leaves, ribbon, pine cones, small ornaments, artificial flowers
- Hot glue gun
- A can of exterior clear coat sealer
How To Make It:
Step 1: Clean your tires well and let them dry. Decide on your first season and spray paint accordingly — burnt orange with black spots for fall, bright red for Christmas, soft yellow for spring. Apply two coats and let dry fully.
Step 2: Seal with exterior clear coat to protect the paint and make repainting for the next season much easier.
Step 3: Decorate! For fall, hot glue faux leaves, mini pumpkins, and raffia around the top opening. For Christmas, weave battery-operated fairy lights around the tire and tuck in pine branches and a big bow. For spring, fill the center with faux or real flowers and pastel ribbon.
Step 4: Place on your front porch, either side of your front door, or along a garden path for maximum curb appeal.
Step 5: When the season changes, remove the decorations, wipe down the tire, and repaint for the next season. The base tire is your blank canvas — reuse it year after year!
Frugal Tip: Stock up on seasonal decor in the clearance sales after each holiday — you’ll have everything you need for next year at a fraction of the price.
Did you love these tire projects? Save this post to your Pinterest boards and come back when you’re ready to create!

 12 Plants That Repel Mosquitoes (And Flies, Stink Bugs & More!)
Leave a Reply