
Table of Contents[Hide][Show]
- SAVE THOSE K-CUPS FOR YOUR SEEDS
- DON’T TOSS THE TRULY’S OR WHITE CLAWS
- PURCHASE SEEDS FOR 25¢ AT DOLLAR TREE
- SAVE THOSE TOILET PAPER ROLLS
- SAVE OLD NEWSPAPERS
- USE LETTUCE YOU ALREADY HAVE
- My Frugal Tips to Start Seeds:
- I did a three-part Titkok Video Series. Be sure to follow me on Tiktok with over 120 others and watch the seed-starting videos below.
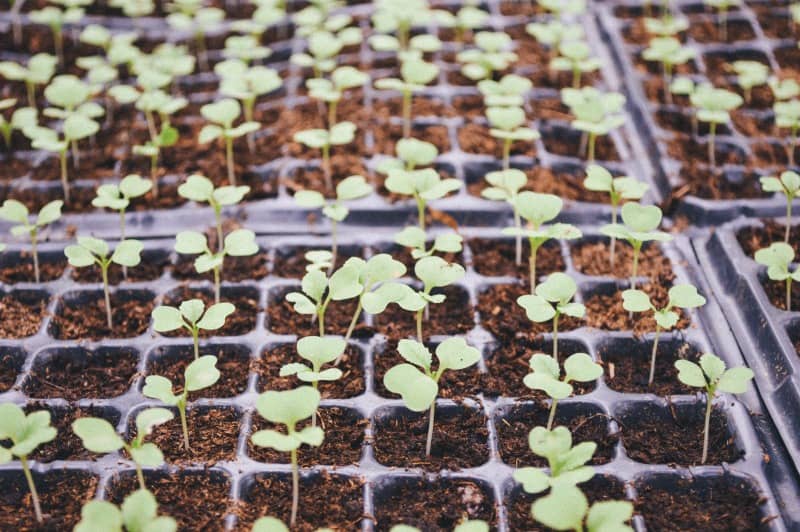
Need tips for growing seeds indoors cheap? These five tips are items you probably have right now lying around your home.
It is just about time to start seeds indoors. This is one thing I have been doing for the past eight years, and I genuinely love it.

If you need to learn how actually to plant the seeds read my post here
There is something incredible about taking a tiny seed and watching it until harvest time. If you haven’t tried your hand at using seeds, I highly recommend just starting one plant.
The cost alone is cheaper, and the whole journey is remarkable. I started this blog a few months ago, so at this time, I didn’t take any pictures of my seedlings last year, so instead, I wanted to give you a roundup of creative ways we frugal farm girls can start seeds inside.
Not only are seeds cheap, but you can also plant them in cheap items! Win-Win situation.
- Wondering when you can start seeds indoors? The Old Farmer’s Almanac has a convenient guide here.
Here is how to get started planting seeds indoors.

SAVE THOSE K-CUPS FOR YOUR SEEDS
What better way to start saving up your K-cups (Which, for real, BJ’s has the best price on K-cups!) than to start your seeds indoors in these little bad boys. Check out this tutorial on creating your seeds using your old K-cups!

DON’T TOSS THE TRULY’S OR WHITE CLAWS
Recently we used White Claw containers. Remember quarantine?!? This is when that started.

PURCHASE SEEDS FOR 25¢ AT DOLLAR TREE
Grab your Seeds from the Dollar Tree! They are 25¢ a pack! Yes, even with the price increase at Dollar tree in 2022, the packets I scored were still 25¢! The American seeds are non-GMO too.
It’s helpful to start a schedule for when to start your seeds based on what region you are living in. Check out this seed starting schedule.

SAVE THOSE TOILET PAPER ROLLS
Okay, we have all seen the creative crafts we can make with the kiddos using our toilet paper rolls BUT have you ever thought about using them for your seedlings?
I hadn’t until I saw this tutorial on using toilet paper rolls for seeds.

SAVE OLD NEWSPAPERS
If you follow my deal blog, we could score a year’s subscription to the Wall Street Journal. But, of course, that was every day of receiving a newspaper.
Sure it makes for great kindling for the fire- but honestly, this makes a far better use. So frugal girls rejoice. We get a free Pennysaver delivered to use every week.
These are great things to save and reuse for seeds or washing windows!
This is a fabulous way to start your seeds indoors.
Check out this tutorial on using newspaper and turning it into a seedling planter!

Print out this FREE checklist to keep an eye on your seedlings.

USE LETTUCE YOU ALREADY HAVE
Maybe you don’t want to buy any seeds, but what if I told you-you could grow something from what’s already in your fridge? Here is a creative and frugal way to regrow fresh produce.

USE LIGHTING TO HELP YOUR SEEDS GROW
Ann has some great tips to get started with indoor seeds and lighting if you are serious about growing and preserving enough food to last you until the next growing season.
I do not use any heat lighting when growing my seeds. We have decent spots in the home for the seeds to get enough sunlight.
If you don’t have a south-facing window, you will be better off starting with some indoor lighting.
You can see more things we use in our home without going to the store here.
Don’t forget once you start your seeds indoors to harden off the seedlings for a couple of weeks.
My Frugal Tips to Start Seeds:
Use leftover plastic garden containers you previously bought flowers in to start seeds. Or save yours from this upcoming season to start seeds in.
Egg cartons are a great way to start seeds indoors.
Label your containers. I don’t think you will remember like I have done so many times in the past and then can’t!
Use Yoplait Kids Plastic Cups/ or any other item in your kitchen to start your seeds indoors.
Use Plastic wrap over your homemade containers until your seed sprouts to keep in the warmth.
Use Seed StartingMix- it’s lighter. This is my go-to bag I buy every year for starting seeds indoors. The other stuff may work, or it may not. Being frugal is not having to spend more money because we tried to save money and go the cheap route 😉
I did a three-part Titkok Video Series. Be sure to follow me on Tiktok with over 120 others and watch the seed-starting videos below.

Be careful with watering. You won’t need to water at all while the plastic wrap is on. You will want to mist the plants because they are not strong as they sprout. After years of seeds and knowing I can quickly over the water, I put all my pots into a tray and then pour water into the bottom.
So the plants take in the water from the bottom.
I use warm water to mix in with my seed-starting soil.
Seeds sprout best at temperatures of 65 to 75°F (18 to 24°C). C
You must keep only one plant in each pot. When I started, I thought it was a waste to kill off one plant when I had two perfectly growing. But, it is a must now. Just clip the others down. Keep the one that is the straightest and looks the best.
So, now that you know the many benefits of starting seeds indoors and how to do it on a budget, what are you waiting for?
Get started this season and sign up for my newsletter so you can be the first to know about all things gardening. I promise you won’t regret it! It is incredible to watch the whole process and enjoy the harvest!
Iowa has a senior meal program called “Meals. On Wheels”. The plastic 3 section containers are durable plastic, and wash easily. I had my Mom save hers for me, but most older people are happy to save recycling for a project, and those little trays work perfectly to start seeds. I use a teaspoon to separate seedlings into individual containers if needed, or transplant to a bed or pot, after they acclimate outside a week.
I love that tip. Thank you so much for sharing. 🙂
I pick up baked goods for our local food pantry from Tops and when they have the 18 pack cupcakes I keep those containers for myself to start seeds in. they have individual cups and the top closes so instant mini greenhouse .
I also do the same with the cake tops. I put two of the tops together One on top of the other can just tape one side so I can open it up and again instant greenhouse.
That is such a smart idea! I love it. Thank you for sharing.