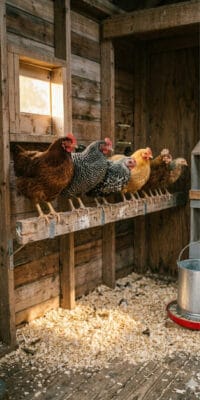
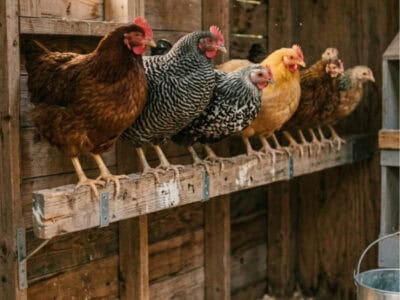
If your chickens are sleeping in the nest boxes, piling up in a corner, then you probably need a better roosting bar setup. It’s an easy fix and something worth considering before you even start building a chicken coop.
Roosting bars are where your flock perches overnight, off the ground and safe from drafts and predators. Getting them right makes a big difference in chicken health, egg production, and even how often you clean the coop. Let’s look at what works — with real examples from real flock owners.
You might also like
- 🏠 How to Build a Coop on a Budget
- 🥚 Why Hens Stop Laying (and What to Do)
- 🌿 Best Bedding for a Clean Coop
- 💰 Frugal Chicken Feed Hacks
What makes a good roosting bar?
Chickens need a perch that’s wide enough to cover their feet — this keeps their toes warm in winter and prevents frostbite. A flat 2×4 board placed with the wide side up is the gold standard. Most breeds do well with 8–10 inches of bar space per bird.
Frugal Tip: Skip the dowel rods at the hardware store. A scrap 2×4 sanded smooth does the job better and costs nothing if you’ve got lumber lying around.
Roosting bar setups (that cost almost nothing)
Here’s where it gets fun. These ideas come from actual backyard flock owners who made it work with what they had:

The Poop Chute Setup (Our Favorite Hack)
If there’s one upgrade that will save you more time and frustration than anything else in your coop, it’s this one. The poop chute setup pairs your roosting bars with a slanted tarp or piece of plywood behind and below the bars so that overnight droppings slide right down into a collection zone at the bottom — instead of piling up on the floor, in the bedding, or on the birds below.
Here’s how it works: mount your roosting bars as normal, then attach a heavy-duty vinyl tarp or a sheet of plywood at an angle, directly behind and beneath the bars, like a slide.
The top edge fastens to the wall just above the roost, and the bottom edge hangs out over a low-sided wooden frame or simply angles toward the coop door. Every morning, the overnight deposits have slid neatly down to the bottom edge.
You take a stiff broom, sweep everything into a wheelbarrow in about 60 seconds, and you’re done.
Why it’s a game-changer:
No more digging through bedding to find the dirty spots. Your pine shavings stay cleaner and last 2–3 times longer — which adds up fast when you’re buying bedding for a large flock. The poop goes straight to your compost or garden pile, and your coop smells noticeably better within the first week.
What to use for the chute:
A $10 blue poly tarp works perfectly and can be hosed off seasonally. Heavy rubber stall mat material is even more durable if you have a scrap piece lying around. Some frugal farm folks use an old shower curtain or even a flattened feed sack — whatever you have on hand that’s smooth enough for things to slide and easy to wipe clean.
Frugal Tip: Cut your tarp about 6 inches wider than your roosting bar length on each side so nothing misses the chute. Secure the top edge with a furring strip screwed right into the wall — no grommets or fancy hardware needed.</p> </div>
📊 Quick poll: What does your flock sleep on right now?
The slope matters. Aim for at least a 30–45 degree angle. Too flat and things sit instead of slide, especially on cold mornings. Too steep and the tarp may pull loose over time from the weight. A furring strip screwed along the bottom edge of the tarp keeps it taut and positioned exactly where you want it.
This setup works best when combined with the drop-down hinged bar since you can fold the roost up flat against the wall to get full broom access to the chute in seconds. Together, they make morning coop chores almost effortless.

We have a piece of plywood slightly angled under ours, and it works pretty well too, every once in a while you’ll have to scrape off the wood.


The Tree Branch Setup
A thick fallen branch from the yard, stripped of bark and sanded. Natural grip, zero cost, and chickens absolutely love it.

The Ladder Roost
An old wooden ladder leaned against the coop wall creates multiple height levels — perfect for flocks with a strong pecking order.

The Pallet Bar
A single slat pried from a free pallet, sanded and mounted. Grab them off Facebook Marketplace, and they’re surprisingly sturdy.


The Drop-Down Bar
A hinged 2×4 that folds flat for easy cleaning. A bit of hardware store chain keeps it level — a total game-changer for weekly cleanouts.
Height, spacing & placement rules
Set bars at least 18 inches off the ground. If you have multiple bars, stagger them like stair steps — chickens will always fight to be highest. Keep the top bar at least 18 inches from the ceiling so they don’t crack their heads. Space multiple bars 12–15 inches apart horizontally so birds can hop up without knocking each other off.

🐔 Make Chicken Keeping Easier
If you’re setting up your coop, fixing roosting problems, or trying to keep better track of your flock, my Ultimate Backyard Chicken Planner can help.
It includes printable pages for daily chicken duties, egg collection, hatching records, feed information, yearly tasks, chicken income, and more.
Grab the Backyard Chicken PlannerCommon Mistake
Placing roost bars directly above nest boxes. Your hens will roost there and poop right in the nesting area — and you’ll be scrubbing eggs every single morning.
Teaching new chickens to roost
Baby chicks won’t instinctively hop up on day one. You may need to gently place them on the roost at dusk for a week or two until the habit sticks. Older hens that have always slept on the ground can be re-trained the same way — a little patience goes a long way.
The bottom line
A good roosting bar doesn’t have to cost a thing. The chickens don’t care if it’s a sanded 2×4 from a scrap pile or a tree branch from the backyard — they just want something off the ground, wide enough for their feet, and at the right height. Get those basics right and your flock will thank you with better sleep, fewer health issues, and one less mess to clean up in the morning.
Want more frugal farm tips?
Join the newsletter — new posts every week on chickens, homesteading, and saving money on the farm.
 Your Guide to Flowering Shrubs for Full Sun (That Look Good All Year Long)
Leave a Reply