
Table of Contents[Hide][Show]
If you’ve been thinking about growing your own veggies and herbs but believe your tiny backyard isn’t up to the task—I’ve been there. Three years ago, I stood in my 12×15-foot concrete patio wondering if “real” gardening was even possible without actual ground to dig into. Spoiler: it absolutely is.
Bucket gardening saved my sanity (and my grocery budget). After two seasons of trial, error, and some spectacular failures, I’ve grown tomatoes, herbs, lettuce, strawberries, and even cucumbers in nothing but 5-gallon buckets. Here’s what I’ve learned works—and what definitely doesn’t.

What You Actually Need to Get Started
Let me save you from my early mistakes. Here’s what I wish someone had told me before I bought the wrong supplies:
For a Basic 5-Bucket Garden:
- Five 5-gallon buckets ($2-3 each at hardware stores, or free from restaurant bakeries—I got mine from my husband who works in construction)
- 10 cubic feet of potting mix, NOT garden soil ($18 at my local garden center)—garden soil compacts in containers and drowns roots. I killed $25 worth of seedlings learning this the hard way.
- Power drill with ¼-inch bit for drainage holes
- Slow-release vegetable fertilizer pellets ($12)
- Total cost: $35-50 if buying buckets, under $30 if you source free ones
Time Investment:
- Initial setup: One Saturday afternoon (about 3 hours for me)
- Weekly maintenance: 20 minutes for watering and pest checks
- Harvesting: 10-15 minutes, 2-3 times per week in peak season
My Biggest First-Year Mistakes:
- No drainage holes in 2 buckets = dead basil plants after one rainstorm
- Using garden soil instead of potting mix = stunted growth all season
- Planting 3 tomato plants thinking “more is better” = a tangled jungle that produced less than my neighbor’s single plant

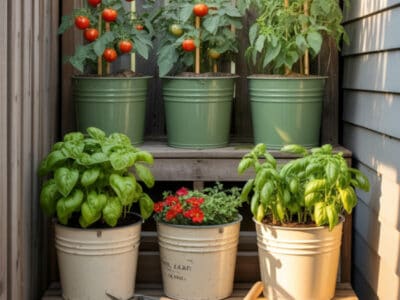
1. Tiered Bucket Gardens
What It Is: Stacking buckets on shelves or stair-step structures to maximize vertical space.
My Setup: I built a three-tier stand using 2×4 lumber from a demolished deck (free from a neighbor) and basic wood screws. Total cost: $0. No carpentry skills? I’ve seen friends use old bookshelves or stepladders with excellent results.
What Works Best Here:
- Top tier: Herbs (basil, parsley, cilantro)—they need less soil depth
- Middle tier: Lettuce and spinach—I harvest outer leaves continuously for 8-10 weeks
- Bottom tier: Strawberries—runners cascade nicely, and I got about 4 pounds of berries from 3 plants last summer
Critical Tip: The top tier dries out FAST. I water it every day in summer vs. every 2-3 days for bottom buckets. Consider drip irrigation if you travel frequently—I rigged a simple system with $15 of tubing and emitters from the hardware store for when I’m away.
Reality Check: My first tiered setup collapsed mid-season because I used flimsy wood. Reinforce everything—wet soil is shockingly heavy (a 5-gallon bucket of wet potting mix weighs about 40 pounds).

2. Hanging Bucket Gardens
What It Is: Suspending buckets from fences, pergolas, or walls using heavy-duty hooks.
My Setup: I hung 4 small decorative buckets (3-gallon size) from my fence using outdoor plant hooks rated for 15 pounds each. Cost: $20 for hooks, $8 for buckets from a dollar store.
Game-Changing Modification: Drill drainage holes on the SIDES of the bucket, about 1 inch up from the bottom, not in the bottom itself. This prevents dripping on your patio or deck. I learned this after water stained my concrete for an entire summer.
What Grows Well:
- Herbs (I’ve successfully grown thyme, oregano, and mint)
- Cherry tomatoes (use determinate varieties—they stay compact)
- Trailing flowers for pollinators
My Failure: I tried hanging a 5-gallon bucket with a full-size tomato plant. The weight bent my fence hook and the bucket crashed down mid-season. Stick to 3-gallon buckets maximum for hanging setups.

3. The Bucket Tower
What It Is: Stacking 4-5 buckets vertically with a central PVC pipe for support, with holes cut in the sides for planting.
Full Transparency: This was my most ambitious project and my biggest learning curve.
My Build:
- Four 5-gallon buckets
- One 6-foot section of 2-inch PVC pipe ($8)
- Drill with 3-inch hole saw bit (borrowed—these bits cost $15-25)
- Total build time: 2 hours of sweating and swearing
How I Did It:
- Drilled 4-6 drainage holes in the bottom of each bucket
- Cut 3 evenly spaced holes (3 inches diameter) around the sides of each bucket, about 4 inches from the bottom
- Drove the PVC pipe 18 inches into the ground for stability
- Stacked buckets on the pipe, filling each with potting mix before adding the next
- Planted strawberry starts in the side holes, lettuce in the top
The Results:
- Year 1: Got about 3 pounds of strawberries over 8 weeks—more than I expected from such a small footprint
- The Problem: I placed it in full sun, and my lettuce bolted within 4 weeks
- Year 2 Adjustment: Moved the tower to a spot with morning sun only. Lettuce lasted 10 weeks, and I added herbs to the side holes—much better
Critical Lesson: Rotate the tower 90 degrees every 3-4 days so all sides get equal sun. Otherwise, plants on the shady side get leggy and weak.
What I’d Do Differently: Use a wider base bucket (like a 10-gallon) at the bottom for better stability. Mine toppled once in a windstorm.

4. Bucket Wall of Greenery
What It Is: Mounting multiple buckets to a fence, wooden pallet, or trellis to create a living wall.
My Version: I attached 9 small buckets (2-gallon size) to an old wooden pallet using metal brackets. The pallet was free from behind a furniture store—just asked if I could take one.
The Build:
- Sanded the pallet to avoid splinters
- Painted it with leftover exterior paint (that “rustic white” look everyone pins on Pinterest)
- Screwed L-brackets to the pallet, then secured buckets to the brackets
- Leaned the pallet against my garage wall (didn’t mount it permanently—I wanted the flexibility to move it)
What I Planted:
- 6 buckets with herbs: basil, cilantro, dill, parsley, thyme, sage
- 3 buckets with trailing flowers (petunias) for color and to attract pollinators
Unexpected Win: This became my “kitchen garden.” I can step outside and grab fresh herbs while cooking—used them constantly all summer. The flowers attracted tons of bees, which helped pollinate my nearby tomatoes.
Maintenance Reality: The buckets on top dried out much faster than the bottom ones. I ended up grouping plants with similar water needs—drought-tolerant herbs on top, thirstier herbs on the bottom.

5. Bucket Garden on Wheels
What It Is: A mobile platform with casters that lets you move buckets easily.
Why I Built This: My patio gets morning sun in spring but afternoon sun in summer (stupid Earth tilt). I needed to move plants seasonally, and dragging 40-pound buckets was killing my back.
My Setup:
- Bought a 3×3-foot piece of ¾-inch plywood ($18)
- Added four heavy-duty locking casters rated for 100 pounds each ($24 for the set)
- Holds 4 five-gallon buckets comfortably
What I Grow Here:
- Tomatoes (I move them to chase the sun)
- Peppers (same reason)
- Basil (it loves being near tomatoes—companion planting works)
Pro Tip: Get locking casters. Non-locking ones roll away at inconvenient times, like when you’re trying to water. Ask me how I know.
Results: Last summer, 2 tomato plants yielded about 18 pounds of tomatoes. One Mortgage Lifter heirloom gave me 12 pounds alone—those fruits were massive.
The Downside: You need a flat, smooth surface. This doesn’t work well on grass or gravel.

6. Hanging Buckets from Trees
What It Is: Suspending lightweight buckets from tree branches at various heights.
My Attempt: I have one mature oak tree, so I hung 3 small plastic buckets (2-gallon) at different heights using rope and S-hooks.
What Worked:
- Lightweight plastic buckets only (metal is too heavy and can damage branches)
- Herbs that don’t need deep soil: oregano, thyme, small basil plants
- Annual flowers for color
What Didn’t Work:
- I tried growing lettuce in one. Squirrels discovered it within a week and decimated every leaf. Apparently, salad bars are irresistible to wildlife.
Practical Concern: Watering these is awkward. I use a small watering can on an extendable pole for the higher buckets, but honestly, this setup is more decorative than productive for me.
When This Shines: If you have a large tree with low, sturdy branches and want an ornamental herb garden, this is charming. For serious food production, I’d skip it.
What I Planted: Radishes, green onions, and small lettuces—all shallow-rooted crops.
Critical Growing Tips (Learned the Hard Way)
1. Drainage Is Life or Death
Drill 4-6 holes (¼-inch diameter) in the bottom of each 5-gallon bucket. Two holes aren’t enough—I lost basil, tomatoes, and pepper plants to root rot my first season because water couldn’t escape fast enough after heavy rains.
The Coffee Filter Trick: Place a coffee filter or piece of landscape fabric over the drainage holes before adding soil. This prevents potting mix from washing out while still allowing water to drain. I go through about 30 filters per season—buy the cheap bulk packs.
For Hanging Buckets: Drill holes in the SIDES about 1 inch from the bottom instead. Water still drains, but won’t drip on whatever’s below.
2. Potting Mix vs. Garden Soil (This Matters More Than You Think)
Use potting mix. Not garden soil, not topsoil, not “raised bed mix.” Potting mix.
Why? Garden soil compacts in containers, which suffocates roots and prevents drainage. Potting mix is engineered to stay fluffy and drain properly.
What I Use: A basic commercial potting mix from any garden center. I’ve used Miracle-Gro, Espoma, and store brands—honestly haven’t noticed much difference. Cost is about $8-10 for a 2 cubic foot bag.
How Much? A 5-gallon bucket holds about 0.7 cubic feet of potting mix. So one 2 cubic foot bag fills roughly 3 buckets.
3. Fertilizer Is Non-Negotiable
Container plants need more fertilizer than in-ground plants because nutrients wash out with every watering.
My Routine:
- Mix slow-release fertilizer pellets into the potting mix at planting time (I use Osmocote—follow package directions)
- Supplement with liquid fertilizer every 2 weeks during active growth (I use fish emulsion diluted per instructions, though it smells like death for an hour after application)
Skip This Step At Your Peril: I tried growing tomatoes without supplemental fertilizer year one. Plants were pale, spindly, and produced maybe 3 tomatoes each. Not worth it.
4. Watering Frequency (More Than You Think)
Buckets dry out faster than in-ground gardens because they’re exposed on all sides.
My Schedule:
- Summer (80°F+): Daily for most plants, sometimes twice for lettuce and herbs
- Spring/Fall (60-75°F): Every 2-3 days
- Overcast/Rainy Days: Check soil first—don’t water if top 2 inches are still moist
The Finger Test: Stick your finger 2 inches into the soil. Dry? Water. Still moist? Wait.
Mulch Helps: I add 1-2 inches of straw or shredded leaves on top of the soil. It reduces evaporation significantly and cuts my watering frequency in half during heat waves.
5. Right Plant, Right Bucket Size
Don’t try to grow everything in 5-gallon buckets just because that’s what you have.
My Guidelines:
- 5-gallon buckets: Tomatoes, peppers, eggplant, cucumbers, large herbs (basil, rosemary)
- 3-gallon buckets: Lettuce, spinach, radishes, green onions, small herbs
- 2-gallon or smaller: Ornamental flowers, very compact herbs (thyme, oregano)
Root Depth Matters: According to the Oregon State University Extension Service, tomatoes need at least 12 inches of soil depth. A 5-gallon bucket is about 14 inches deep—perfect. A 3-gallon is only about 11 inches—too shallow.
6. Companion Planting Works (Sometimes)
What Worked For Me:
- Basil near tomatoes—anecdotally seemed to reduce pests, plus convenient for cooking
- Marigolds scattered among vegetables—attracted beneficial insects and looked cheerful
- Nasturtiums near cucumbers—supposedly deters cucumber beetles (didn’t work for me, but the flowers were pretty)
What I Won’t Bother With Again:
- The “three sisters” (corn, beans, squash)—way too cramped in buckets
7. Accept That Some Things Just Don’t Work in Buckets
Poor Performers in My Experience:
- Corn: Needs too much space, pollination is poor with few plants
- Watermelon: Vines sprawl everywhere, fruits are heavy and tear vines
- Carrots: Never got straight roots—they hit the bucket sides and got deformed
- Potatoes: Technically possible but yield was pathetic (2-3 small potatoes per bucket)
Stick With Winners:
- Tomatoes (cherry and determinate varieties especially)
- Peppers (all types)
- Lettuce and salad greens
- Herbs (almost all varieties)
- Beans (bush and pole varieties)
- Cucumbers (compact varieties)
- Strawberries
What This Actually Costs and Produces
Let me break down my second-year bucket garden honestly:
Setup Costs (10 buckets):
- Buckets: $30 (got 4 free, bought 6)
- Potting mix: $50
- Fertilizer: $20
- Seeds and starts: $45
- Hardware (hooks, screws, casters): $40
- Total: $185
That Summer’s Harvest (Conservative Estimate):
- Tomatoes: 30 pounds
- Cucumbers: 15 pounds
- Peppers: 8 pounds
- Lettuce: Continuous harvest, probably equivalent to 20 store packages
- Herbs: Used fresh constantly, equivalent to $80-100 of store-bought herbs
- Beans: 6 pounds
Store Value: Roughly $280-320 worth of produce (using farmers market prices, not grocery store).
Return on Investment: Broke even year two, ahead from year three onward since buckets and hardware are reusable.
The Intangibles:
- Tomatoes that actually taste like tomatoes
- Lettuce picked 5 minutes before dinner
- No pesticides I didn’t choose to use
- The satisfaction of saying “I grew this”
Final Real Talk
Your small backyard isn’t limiting you—in some ways, it’s liberating. I don’t have to commit to digging up huge sections of lawn or installing permanent raised beds. If something doesn’t work, I move a bucket. If I want to try something new, I add a bucket.
But let’s be honest: Bucket gardening isn’t a magic solution that requires zero effort. You’ll water more frequently, fertilize more often, and spend time managing a tighter space. Some plants will fail—I lose something every season to pests, disease, or my own mistakes.
Is it worth it? For me, absolutely. The taste of homegrown produce, the reduced grocery bills, and the simple satisfaction of eating something I grew outweigh every frustration.
Start Small: If you’re new to this, start with 3-5 buckets, not 20. Grow forgiving plants like cherry tomatoes, lettuce, and basil. Learn what works in your specific space—your sun patterns, your climate, your available time.
After two years, I’m still learning. Last season, I discovered that my patio’s afternoon shade is actually perfect for extending the lettuce season into summer—something I wouldn’t have known without experimentation.
If you try any of these setups, I genuinely want to hear how it goes—what worked, what failed spectacularly, what you’d do differently. Gardening is all about sharing knowledge, and I’m certain you’ll discover things I haven’t yet.
Now go drill some drainage holes and get growing.
 DIY COMPOST TEA
Thank you so much for the info!!!!!! I’ve never seen a post that addresses bucket gardening! I have a garden in pots in my driveway and you’ve given me great tips to make it better! Thank you…….I’m excited for spring!
Oh I am so excited for you! It really is an easy fun way to try gardening!
This article popped up in my email at the best time. I am in year 3 of learning and growing with gardening. My mom has a huge green thumb, so I’m hoping I can follow. I appreciate how you shared your mistakes, as well as the tips. It was eye-opening for me, and I was able to understand what I had done wrong last year. So now I’m more confident and excited to get started on my container garden for this year! Thank you again 🙂
Thank You! I have been ‘dabbling’ for a few ywars since becoming old and partially disabled, mostly tomatoes, basil, with success and cucumbers, not so much. With your amazing trial and error sharing, I will try more.