
In the winter, when the skies are grey everything feels too dark. All of a sudden, it’s like the nesting phase of pregnancy; everything needs to be rearranged and made to feel fresh and new.
My Habitat for Humanity Restore dining room set was a lifesaver! It was a steal of a deal too. But the dark colors of our new dark floors were making me go crazy.
We ventured out to the furniture stores, and I fell in love with a few dining room sets. I couldn’t wrap my head around spending $1000 on a set. Why?
Well, our one-year-old lab would probably eat at the sides, my cat would scratch up new fabric chairs, and my kids like to take out the Play-Doh and murder it with forks.
No worries with the Chalk paint on the table. You can’t see the holes unless you squint way down close! On the old finish, you saw all the holes while eating meals.
Instead, I knew I had to paint it. My husband said this table couldn’t be sanded down because it’s not real wood.
In comes Chalk paint.
Chalk paint is a great choice for pieces without needing much prep work.

I’m in a blue phase. We recently made our kitchen cabinets a deep blue, which I love. Over in the dining room, when I made over an old wood corner cabinet, I chose blue hues.
Painting the dining room table and the buffet table blue started out because it was the color paint I had left.
Five years ago, I bought this little bottle of chalk paint from Walmart. I used it on small projects. Picture frames, mostly. It is a blue tint. Since I started this project on a whim and did the buffet table first, I had to get the dining room table to match.
Check out my BLUE Kitchen Cabinet MAKEOVER!
They didn’t have any of this color chalk paint at our local Walmart. I went with the next best option. A blue and white chalk paint from Walmart would do. Each can be $19.99. You can order it online, but when I’m in the mood to get a project started, I have to get it started now.
I love how it turned out and am so thrilled I only spent $50 total on this makeover.
READ OR PIN: How to Spray Paint A Rusted Grill for $10
Materials used:
- Waverly Inspirations Chalk Acrylic Paint – Crystal, 8 oz. $6.54
- Waverly Inspirations Chalk Acrylic Paint – Plaster, 8 oz. $6.54
- KILZ Sealing Wax for Use With Chalk Style Paint, 2.4 oz. $9.94 at Walmart. Or more on Amazon here.
- Newspaper
- Paintbrush
- Sandpaper 100 grit
- Leftover Grey paint Paint From Our Corner Cabinet.

I did a light sanding before putting the first coat on. I love that you do not need to strip the wood down when using chalk paint.

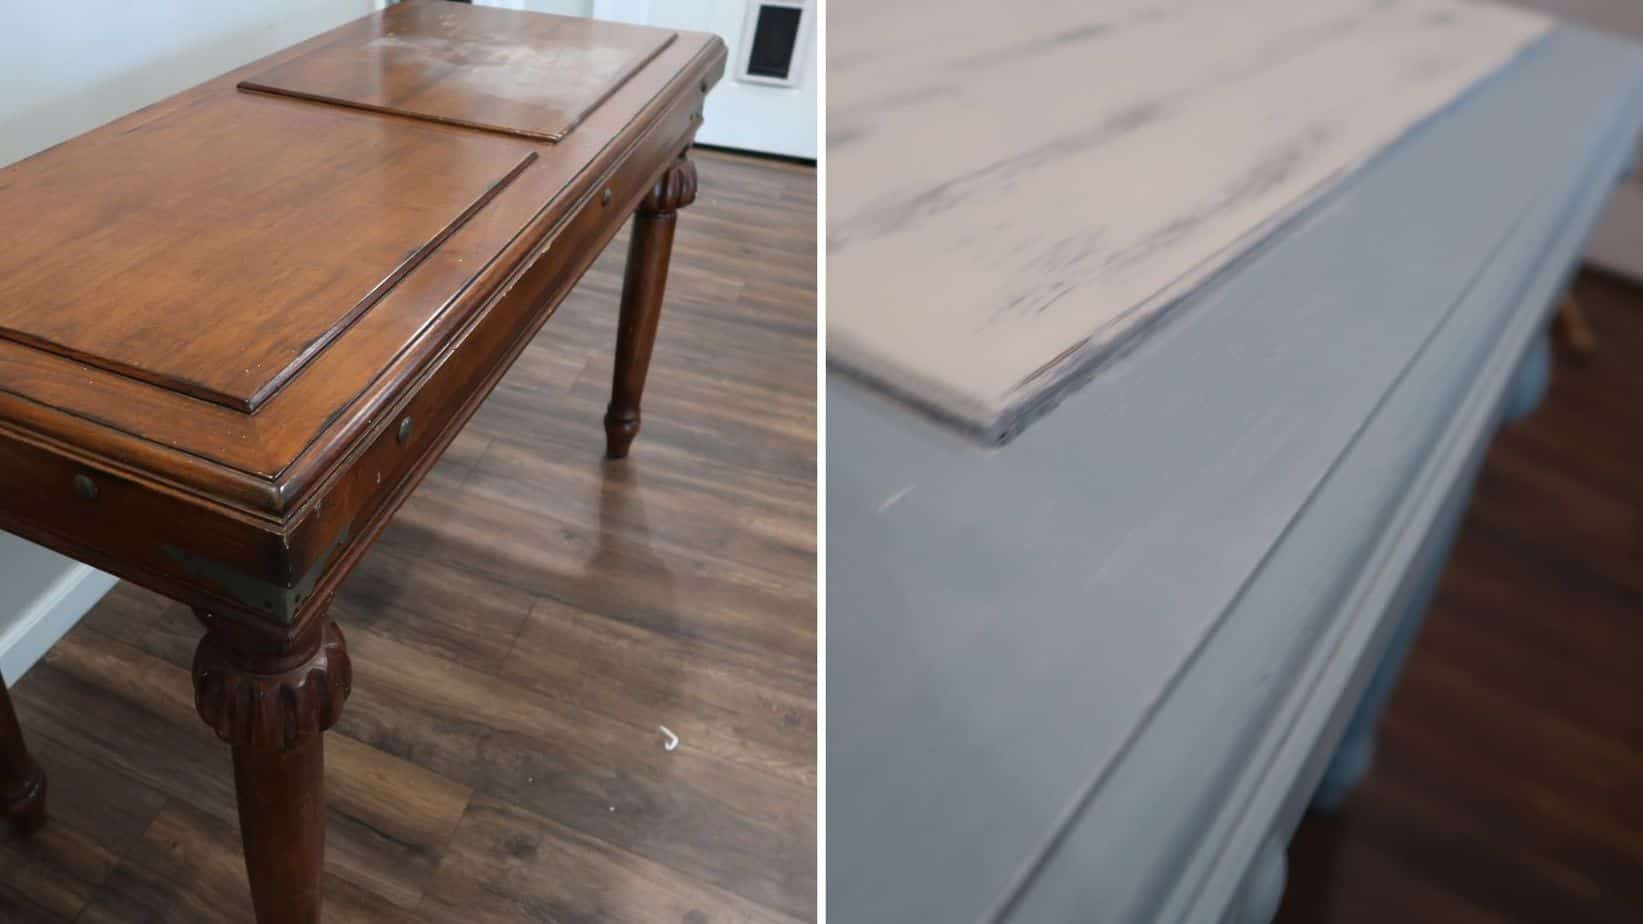
This is the table before I started sanding anything. One thing I love is you can be a little messy with lines because you can blend it in. You can see on the outside edge of the white the blue is a little messy line. It blended in enough after sanding it fits the look.
MAGIC ERASER

When I was painting this table I started to paint around these. By the third coat of paint I was getting annoyed and wanted to be done.
That’s what I did. I painted over them. I wasn’t sure what to use but I knew there had to be something to take it off.
In comes the best MAGIC ERASERS! I got the sheets from BJs since I was doing a review for my BJs blog and they worked great! You really need to rub on it, though. So much you get holes.
I love the blue colors in our house this year. Check out our DARK blue kitchen cabinet makeover HERE.

I wasn’t sure what I really wanted the end result to be. As I started putting more layers on and sanding I stopped when I had enough sanding. It worked for me!

You could continue to sand bigger lines or even more to give it whatever look you want. That is what I love about the layering and sanding with chalk paint, you can take it down as far or as little and it still looks unique.
READ OR PIN MORE:
- How We Built a Barn Debt Free
- 5 DIY Ways to Get New Countertops for Cheap
- Our DIY Farmhouse Kitchen Makeover Before & After
- What Not to Do When Painting Cabinets
- 3 Kitchen Makeover Hacks to Save A Load of Time

After you have achieved your desired look you need to add a sealing wax to keep your paint and table sealed.
I added a thin coat of sealing wax BEFORE I started painting. This helps blend the paint. The catch is you need to sand right away before the paint dries and hardens.
After sanding, I did another coat to give it the final seal. According to the package on the sealing wax you can reseal every year or as needed.
Final Product


And I love the color of the final product! It gives the room a pop of color now.
I think my Christmas decor will fit nicely with it and the white look. It also brings out the white trim woodwork in the room.
- How to Save Money Online Grocery Shopping in 2026
- Stop Spending Money in 2026: The Real Steps No One Talks About
- 11 Simple Ways to Live Within Your Means in 2026 (When Everything Feels More Expensive

CAN YOU GET CRAYONS OUT OF CHALK PAINT?
I mean, look how my kids already got crayons on it. I used the thin magic eraser very lightly on the crayon on the table. It removed it. I had to buff the wax it seemed, again.

WHAT TO CLEAN IT WITH
It is important to get the wax to cover the entire piece. Let the wax dry for 24 hours before using. We waited two days before I let anyone put anything wet on it.
I’ve been using the awesome cheap brand from Target- Smartly. I use this all purpose cleaner on it. You can’t go wrong on the price!
 Am I In Over My Head With More Animals?
I’m so glad I found this post!!! I have two dressers and a side table that I’d like to redo!!!! However, I don’t want to do a bunch of prep work. I’ve really been wondering about chalk paint and if it could do the job. I didn’t know any personal experiences that I could trust for review, so thanks for this!!
YAY! You gotta go for it. It is so easy to use with such minimal prep. And it’s been holding up great!
Wow table came out beautiful. I’m not as adventurous to try something that. Goog job
Thanks Debbie! Yes you could totally do this!
Hi! So you lightly sanded the table then added a thin coat of wax before painting? Then sanded after each coat of paint and again to seal at the end.
Yes