
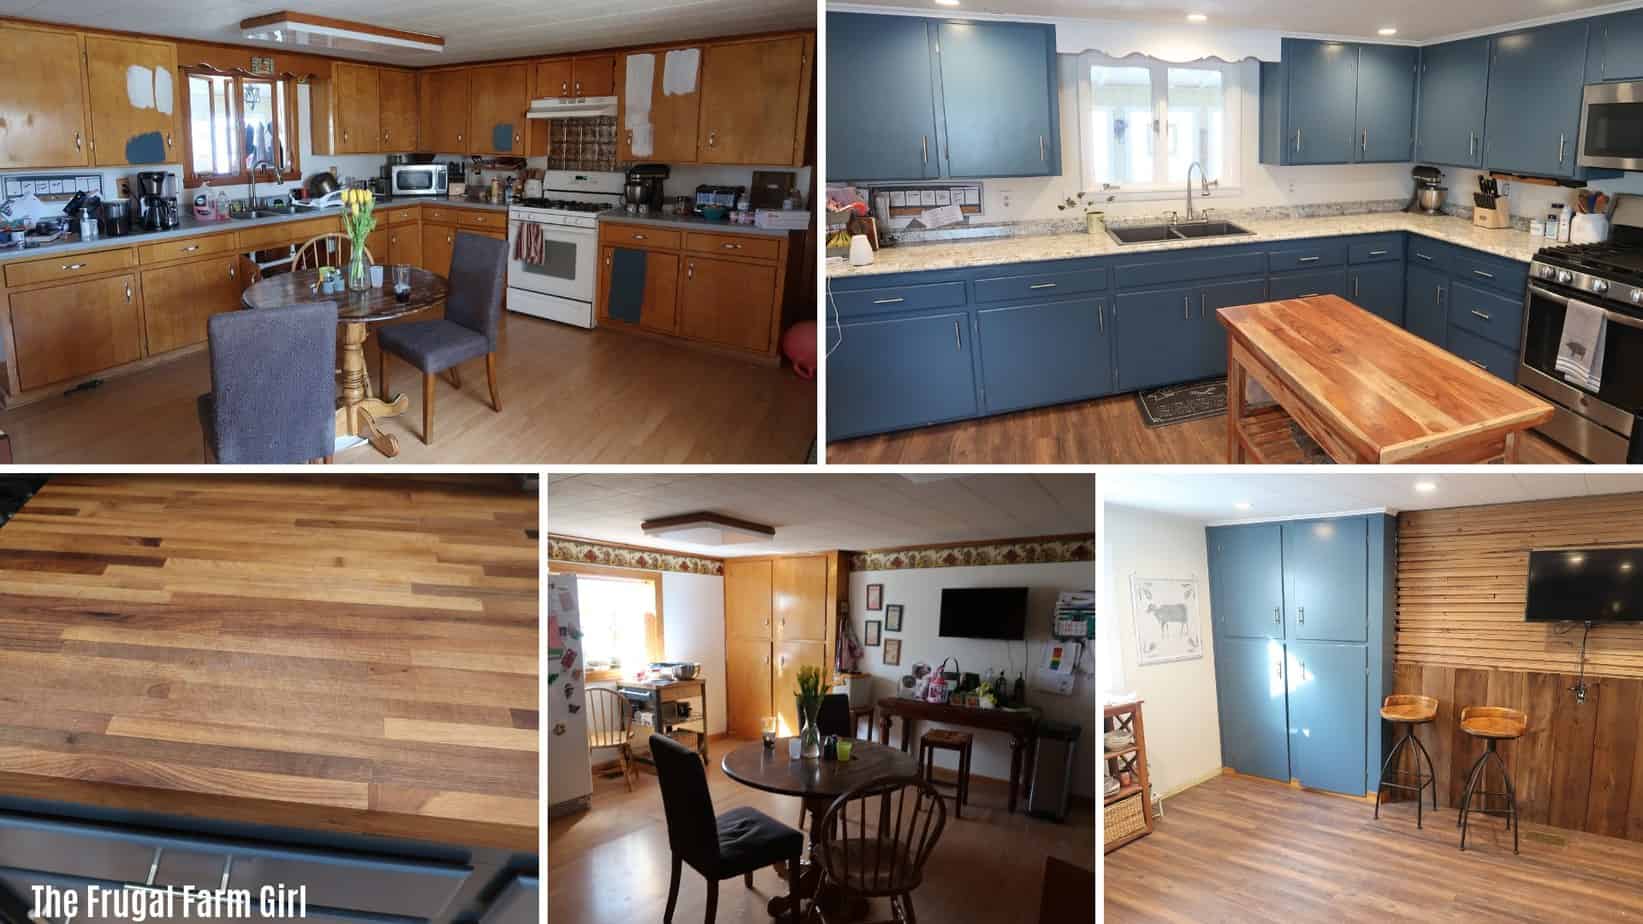
You know how it starts. You ask your husband what he thinks about a blue color on the cabinets? He gives you a look, like he really doesn’t care, but he’s wondering how involved he is going to be.
My husband and I both agreed our farmhouse kitchen was outdated and not our favorite. Yet, our kitchen is huge. A true old fashion 1850’s farm kitchen. Okay the decor was more 90’s but our house was built forever ago.
There were so many other things we wanted to tackle before the kitchen. After three years I decided it would be a good time to paint the cabinets while my husband built a new barn.
That’s how we are. Hyper, go- getters and we always need a project. The thing is I didn’t really consider just painting the cupboards until I was flipping through a magazine and saw a beautiful blue I knew was the one.
If you are new to our blog, we are a very frugal couple. We really don’t like spending a lot of money on stuff if we don’t have to. We’ve paid off all our debt, working on the mortgage and built our barn debt free.
We completely DIYed every single room in our first house. In our new adventure this farmhouse we plan to do all the projects ourselves.
The biggest obstacle?
TIME. I knew I could do this project myself. Something came over me I needed to get rid of the oak color and bring in that blue I fell in love with.
We did a few other minor changes that I’ll share below.
I shared a post with the breakdown of cost and exact supplies we used in the farmhouse kitchen makeover because we stuck to our budget here.
We did this renovation in 2019 and in 2021 we tore out a wall! Scroll down for the latest look at how the kitchen is now!


THE CEILING

The ceiling lights were horrible. Not only in looks but the amount of light
We were able to get recessed lighting kits on sale at BJs Wholesale club. Since I am a blogger over at Mybjswholesale I’m always on top of all the deals. I wish they still offered these lights.
I painted over the ceiling tiles with a standard ceiling white paint. I used an entire gallon of paint. These tiles really soak in the paint.
DEMOLITION

We demoed a couple things I wasn’t planning on. The big cabinet in the back corner wasn’t even attached. We had a narrow hollow door that went from the kitchen to the garage. You could see the light coming through the door which means we were losing a lot of heat in the winter.

To expand that wall to get a regular size door I thought it would be better to get rid of the bulky cabinet. The only thing I was storing in it was garbage and a broom.

We added an exterior door and the window brings in more natural light to what used to be a dark corner. Now we just have to hope we get woodwork up soon!
We found a unique feature in our home when we tore out the carpet on our stairs, some of our walls are stacked wooden walls. My husband had a feeling this kitchen wall was stacked.

I love the shiplap look but this is awesome, unique and FREE so I told him take down the drywall.

This wall took a lot of scrubbing with a wire brush. We are guessing this was the exterior wall long ago. Our house was built in 1850.
THE CABINETS

I decided to paint the cabinets a deep blue. It was originally a Benjamin Moore color I grabbed out of a magazine. I took it to Home Depot and had them color match it. They type the name in and I got the same thing for cheaper. We chose the Behr Paint and Primer in semigloss.
The paint color is called Shipwreck.
While we are talking about paint I also painted the walls. I had them color-match Benjamin Moore’s White Dove. I went wit Behr Marquee because I didn’t pay attention after purchasing the sample it was the Behr Marquee. It worked great. I only needed one coat of paint on the walls with it.

It is called White Dove for the Behr Marquee. It’s one of the popular farmhouse white colors you see on Pinterest.

I sanded the surface of every cabinet. It helps to label each cabinet as you are going so you know the original spot. This was important for ours because they built the cabinets into the crooked floor.
We didn’t get new cabinets so there will still be the quirks of a little-crooked door here and there, but it doesn’t bother me. We didn’t go into debt for this, and we still have pets, kids, and life happening all day every day in the kitchen.
When you do a big kitchen project with animals and kids to tend to, you will have messes like this. I started this project in March so I had to let the cabinets dry in the basement with a fan on.
COUNTERTOPS

We replaced the painted over countertops. I’m not sure how many layers it had but it was chipping all over. We went with the standard in stock laminate countertop available at Home Depot.
I didn’t see a point in paying for an expensive countertop material when we were just painting our cabinets. You will pay three times as much if you order laminate custom counter tops.
I loved in our first home there was a section of butcher block as the

I spent hours searching online for an affordable kitchen island. They aren’t cheap. I felt a little hopeless and knew I wouldn’t be splurging for the huge island with a section for meal prep on it.
I chose to go with butcherblock for the end of the counter. It isn’t choice for everyone but for me, it’s what I needed.
I did splurge on a new stove and microwave.
THE SINK
This sink was gross. A new one was a must. I opted for the slate look and almost considered the slate appliances too. I knew I didn’t want another stainless steel sink. I also didn’t think I wanted the white farmhouse sink either.

HARDWARE & PULLS
I spray painted all of the hardware for the cabinets. These were expensive and I wasn’t about to spend $3 or $4 per piece. We have a lot of cupboards.
I put all the screws and hardware on cardboard and spray-painted them in the garage. It was easy to do. I used a ___ spray paint from Home Depot.

The pulls I scored a major deal at Home Depot on half. I knew these were the ones I wanted from my magazine inspiration. Low and behold on a hang tag at Home
There are decent deals on Amazon for these bar pulls here.
These ended up going on the drawers because they are slightly smaller. The good news is they were half the price of the stainless steel. You can’t tell the difference at all.


FLOORING
The flooring was one of the last things we did. This kitchen still isn’t completely done. We are working on the stacked wall and turning barn wood into a bar area.
I originally wanted the same flooring we put into the office. In our farmhouse, we put in new flooring upstairs and in my office. it wasn’t available anymore so I brought home 10 different flooring pieces.


I always go by price. I don’t even look at the Pergo brand because I know we are not paying for it. Eric pushed me to go a little darker in the flooring. I wasn’t too sold on it.


Two things that helped us choose the current laminate flooring we have were,
- Price
- Width
I love the look of the wider planks. This was a better brand and on sale for $1.99 sq/ ft. Normally it was $2.89 sq. ft.
We decided to replace our entire downstairs flooring so it would match throughout. The price of this one on sale saved us $700 if I was to choose one not on sale.

I was all for it. It sealed the deal for me. When we went to order the flooring the tag was on the wrong spot. We pushed for them to give us the price and they did! Honestly, the frugal girl I am, I probably wouldn’t have gotten that one if it wasn’t that price. I would have continued to look and find a cheaper one.
It’s in the blood guys, I can’t help it. I love the flooring. It looks better in person than I had envisioned. It completes the look over the yellow tone flooring before.
APPLIANCES/WALL
After removing the big cabinet I moved the fridge over away from the window. It helped the window catch your attention. I did end up buying a new stove and microwave.
A new fridge, well this one is a great size and still works. It’s not standing out too terribly so I’m sticking with it. This wall arrangement still isn’t my absolute favorite, so I’m open to suggestions. Yet, it looks a lot better than it was.

ALMOST FINISHED NOT QUITE

I wish this kitchen was completely done, but this is the way it goes when you do multiple projects yourself at a time. We still need to add a piece of barnwood to this wall for a bar. I’m not sure if I will white wash the stacked wall on top to brighten it up.
UPDATE: Here is what we ended up doing with this wall. We covered up the wooden wall.


OVERALL SATISFACTION


In 2021- we decided to rip out a wall. This kitchen is my favorite room because it is so big for our family of four. We decided to take down a couple cupboards and move them over to the corner by the door.

The only thing we had to buy for this was the light fixture at the top. We ended up redoing our sunroom too, which is my second favorite room in the house now.

We still had some of our old barn wood, if you follow along and saw our 100-year barn fell down, and got to use two more pieces in the kitchen.

I love our new kitchen. The color works, and I’m so glad I decided to tackle something I’ve never done before. I love learning new things and taking on new challenges.


The before-closed-in kitchen felt so boxy and now with the view and all the windows on the porch, it feels open and airy. I never imagined this view when we first started the kitchen renovation, but that’s how DIY projects on a budget go.
You do what you can with the time and money you have, and then when more money and time come about you can keep on adding and taking away.

The best part is when they turn out better than you imagined. This is one of those. My second favorite part is it’s all paid for. We aren’t making monthly payments on it. No need to have any guilt or whatnot because it’s been bought and paid.
If you want a new kitchen, I encourage you to try to update it yourself. If you can avoid buying new cabinets and paying someone, you will save a lot of money.
Very very very nice . Great job. Love it.
Thanks so much Mooka!
You are a brave woman. I know people who would totally freak if their kitchen was the least little bit disturbed. I love renovation and demo is my favorite part. Putting it all back together is the hardest for me. Bravo to you!
It is hard to put it back together. Thanks for stopping by Mary 🙂
Yes! Very brave to take on such a huge project but it turned out wonderfully. I absolutely love it!
Thanks Janelle 🙂
I love it! We have been looking into updating our kitchen bc the color scheme is just all over the place right now.
Thanks! You should go for it! Well worth the risk.
What is your countertop pattern/color called??
I have the material with links to the items we used here https://www.thefrugalfarmgirl.com/cost-kitchen-remodel/
Beautiful work God bless you and your family, can we have an idea of what this Reno costed you?
HI Maria! Yes, I’m actually working on a separate post breaking down the entire cost and all that jazz!
Beautiful kitchen. I really like the blue cabinets. It makes a nice contrast with the walls but remains. easy on the eyes.
Thank you so much Randy!
Great job, i noticed the window was what looked brown but is now white, did you replace the window? I am getting ready this spring to paint out cabinets but my one issue is i have wood tone vinyl windows, yuck!
Nope we painted the window. It’s all wood around the windows on the inside. That is a bummer, it may not look that bad!
Is the paint colour around your window and the trim around the door frames the same colour as your walls? It looks whiter then the walls. It’s a beautiful kitchen!!
Hi Debbie no the trim paint is the bright white regular can of Behr paint and the walls is White Dove by Benjamin Moore.
Great lookin Kitchen Where did you get the sink and could you tell me the color blue?
Hi Brian thank you! Here is the post with all that information for you https://www.thefrugalfarmgirl.com/cost-kitchen-remodel/
You did a lovely job on your kitchen, it looks fresh, clean, stylish and just really good. As a suggestion for the fridge wall. If you didn’t destroy the cabinets that were there (during demo) consider bringing 2 sections back, cutting them down to a 12 or 14 inch depth – so as not to block light then paint them to Mach the other cabinets and flank the fridge to look more built in. Then consider more barn wood on that wall including around the window. It would bring continuity to your design. Also, use the cabinets to store all the misc. stuff on top of and around the fridge and use the barn wood walls to pin up the kids artwork on for true display. It would just require more work but almost no money. That area would then become part of the room and there is never to much storage in a kitchen! Not that I have an opinion!!
Thank you! I love those suggestions!
I’m a bit late and haven’t read other posts to see if you’ve done anything to the wall with the fridge. personally I think I’d put a stock cabinet pantry cabinet (18″ width) on each side of the fridge. add a board across the top of the fridge. then add crown molding. paint it white for now. if you update the fridge I’d choose black and paint the cabinets black also. or stainless and a blue that blends with the stainless.
Ohh I love that idea. No haven’t really done anything with the wall yet.
Still don’t see where your new sink was purchased or it’s brand.
Hello all the items we used with a price breakdown can be found in this post here –>https://www.thefrugalfarmgirl.com/cost-kitchen-remodel/
I found this while looking for ideas for painting our old oak kitchen units . I hadn’t considered blue before but loved the way yours looked . I went for blue on our base units and white on the wall units . So pleased with the outcome and saved loads by reusing the existing kitchen . Thank you
Claire that is awesome! If you are up for it you should share a picture!
for the wall with the fridge … what I would do (and this is just my opinion) is place stock cabinets with matching countertop on either side or all to one side. Choices for the wall: upper cabinets, open shelving, or chalkboard/corkboard wall. This would give a handy place for preparing sandwiches, quick drinks, or gathering items needed from fridge so not to hold the doors open longer than needed. This area could also be used for buffet style meals (I’d place all the desserts there) like Thanksgiving or other holidays. It could also be a place for keeping the coffee pot so my DH could get his creamer from the fridge righ there next to him.
Oh Tammy awesome ideas! I love them.
Just wondering- did you sand the frames? It makes a huge mess even with covering most of the kitchen. And what about primer? I am in the process of doing this to my kitchen. At Sherwin Williams, I ended up buying a $100 gallon of paint (and it wasn’t even top of the line) and they said I would need a really good primer also. I’m really happy with the outcome so far, but it seems like you were able to skip a couple of steps.
Hi! Yes I actually did a separate post with everything we used here –>https://www.thefrugalfarmgirl.com/cost-kitchen-remodel/
. I did sand the doors and I used the paint and primer paint mentioned in the article above. I did put three coats on some. All them had at least 2 coats.
Our cupboards were in rough shape. Its a long process but worth the cost you save for sure 🙂
What flooring did you use? Lobe your kitchen
I listed the materials in this post Thanks 🙂 https://www.thefrugalfarmgirl.com/cost-kitchen-remodel/
I absolutely love it!!! I have saved my kitchen for last as far as reno but ya my cabinets are oak and def gonna go with a color yours turned out sooooo nice!!!
Aww thank you so much! Good luck with your reno! It’s so exciting how much color can change the whole room.