Are you ready to raise and butcher your own chickens? Wondering how do you go about gutting a chicken? Today my husband and I are sharing a step-by-step guide to help you butcher your bird. When you process your own chickens, you will save money.
Growing your own chickens isn’t any cheaper than buying store-bought, and to cut expenses down more, my husband and I do all the processing ourselves.
Raising your backyard chickens for meat differs from raising a dual-purpose breed or even an egg layer. When it comes to raising your own food, it usually isn’t cheaper, but the taste, the peace of mind of knowing what we fed the chicken and how it was cared for is worth the extra cost and effort.
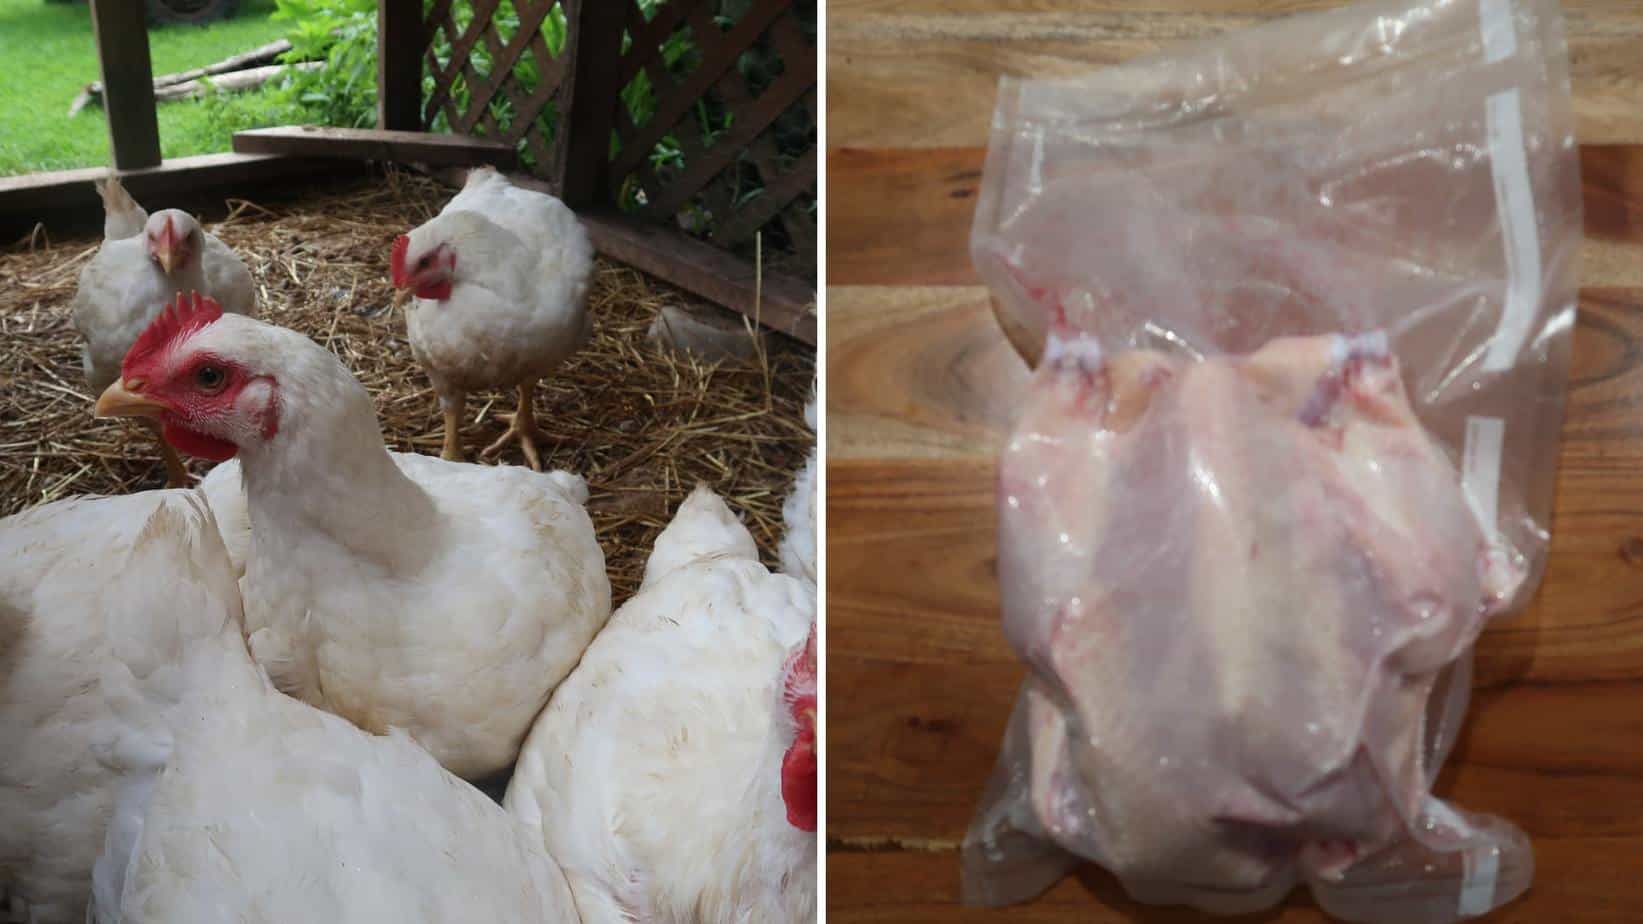
We have tried a dual-purpose bird for meat in the past but decided the Cornish Cross broiler is the best meat chicken due to its fast growth rate and great flavor.
You can scroll down for all the tips or watch the video at the end.
Don’t forget to leave a comment sharing with us your tips or any questions you have at the bottom of this post.
The Best Chicken Breeds to Raise for Meat
The first step is finding your breed. The most recommended meat chicken by poultry farmers is the Cornish Cross broiler. We are in our sixth year of raising our birds, and we continue with this breed because they are the best meat chickens.
The cost of raising chickens can add up quickly, so Cornish cross-broiler birds can be ready for processing around five weeks of age.
If this is your first time, it’s hard to imagine those sweet little chicks will have you saying gross in just a few weeks.
In the past, we did raise Wyandottes. The Wyandottes are a dual-purpose chicken, meaning they will lay eggs that you can use for meat. The taste of the Wyondottes was terrific; our issue became we liked the amount of meat you get from Cornish Cross broilers in a shorter amount of time.
Freedom Rangers, aka Rustic Rangers, is another popular meat bird breed. This breed takes a little bit longer to raise, around 12 weeks, than the Cornish cross, but is known to be a healthier bird.
In the past, with our Cornish Cross, we have always lost at least one bird. They are pretty sensitive to temperature changes and can quickly get too hot. This is key to raising your meat birds, picking the time of year they will grow and when you will be butchering.
I would say expect to loose at least one or two up front when you are purchasing birds.
We have purchased our meat birds from Tractor Supply, Runnings, and then a local hatchery. You should be able to find similar stores and hatcheries in your area.
I think meat differs when you feed your birds more fruits, veggies, and bugs. But, unfortunately, with this breed of chicken pasture, raising them along with our flock wouldn’t work. I do give them a bunch of veggies and fruits, though.
These birds will eat non-stop. We did crumbles for the first two weeks and switched to pellets because this is what the rest of our chickens eat.
I gave them lettuce, apples, and other food scraps during this time.
It’s best NOT to feed them the night before you decide to butcher the chickens. In our video, you will see this one we fed before and how full the crop is.
The birds will always need clean water. I find that twelve birds is the maximum amount for a one-gallon waterer. Ideally, a one-gallon waterer would be best for six birds, but as a frugal person, I’ll fill it up a few times a day instead of buying a larger one. I know, I know!
When purchasing these birds as chicks, they will need a heat source for the first week or so. We use a heat lamp and hang it up in the corner. You could raise these meat chicks the traditional cheap way too.
we are now in our sixth yard of raising meat chickens. We’ve made mistakes along the way, and our system isn’t imperfect, but it works for us.
As a frugal couple, we like to do things in a cost-efficient way but also in an easy way.
Don’t let the cost of raising your meat birds stop you from trying it. Last year ( 2022) was the first year we purchased Cornish cross birds through our 4-H program.
At the end of the program, we had two birds processed by a local poultry farmer for free. The cost they were charging for a whole chicken, not shrunken wrapped or anything, was $5 a bird.
If you wanted it in different cuts the cost increased. For me, I knew that was another sign that butchering the chickens ourselves was well worth it. Especially because we can use our Foodsaver for wrapping,
( which we get to later)
You only need a few items; we plucked our chickens by hand without a plucking machine or anything else for the first two years. If you want to care for the chickens and have a poultry farmer process them for you, call around to find the best deal and reputation. Facebook poultry and livestock groups are a wealth of information and valuable recommendations too.
Our favorite breed of bird for meat is Cornish Cross Broilers.
The three main reasons it is our favorite:
Grow Quickly
Easier to Pluck
Lazy bird- doesn’t need a lot of room to roam
I had horror stories about these birds before we took the dive and raised our own. Others told me, “They grow so big so quick they break bones. The smell is horrible and so on and so forth.”
The birds, indeed smell worse than our Rhode Island Reds, Silkies, and other breeds of chicken.
We watched YouTube videos about people taking old washing machines and using a chicken plucker, and we ended up trying to make our own with a drill, but it wasn’t worth it for us. We found the scalding to be the fastest and easiest.
But for only 5-8 weeks, you can handle it.
You need to know three basic steps that are crucial when it comes to butchering chickens. They are explained in more detail below, but they are:
Have a scalding pot and the right supplies
Butcher at the Right Time of Day
Butcher a realistic amount of birds
Things We Tried to Make Butchering Easier
The first time we butchered chickens, the breed was Wyandottes. We didn’t have a clue what we were doing. We were going off my husband Eric’s butchering skills with deer.
I put all my faith into him because he has butchered countless deer before. So our first time, we thought doing it without a scalding pot would be fine.
You can do it, but it makes the plucking process take much longer. This led us into trouble when we decided to kill six chickens at one time before beginning plucking. Add in higher-than-desired temperatures and flies buzzing around, making for a bad situation.
You must choose a cool day or after sunset and ensure you can get clean and bag the chicken promptly.
It would be best if you butchered your birds at the right time of day. For example, if you get birds in the spring, by the time they are ready to go, you may be experiencing a very HOT day.
So, you will need to adjust accordingly. Wake up early enough the sun won’t be beating down on your table.
It’s okay if you don’t know the exact age of your chickens; you will be able to tell when it’s time for butchering by the size. One year we waited two extra weeks because we thought the birds looked a bit small.
At that point, they were closer to the ten-week mark and not as good. Last year we processed at six weeks, and that was a good time. When they go past five to six weeks, they also have more health issues.
Don’t be like us, thinking we want to get more meat and let it grow a few weeks longer; stick to butchering at the five-six-week mark.
Do Only The Amount of Birds You Can Pluck and Process
We thought when we did it our first time; that we would do six birds to start. Six birds seemed easy enough to handle.
So Eric killed all six and had them sitting on the table. I started plucking. The birds were tough to pluck. Plus, it was only the second time I’d ever plucked a bird, and I was a little disgusted.
The sun started rising around the barn, quickly heating up. The flies started to come. It was a hot 80 80-degree summer day.
Both of us were starting to panic, and when you and your spouse are stressed and unsure what you are doing, you argue.
We rushed to bring the birds into the house to avoid the heat and flies, and it was not fun.
This is when we broke down and decided to go with Cornish Cross.
I won’t go back. The Wyandotte meat was intensely flavorful and moist, but the Cornish Cross is just as good.
*Now, after doing this for a few years, plucking a chicken is easy peasy compared to our Pekin ducks!
I find they do better with crumbles, and I like giving them the higher protein since they aren’t foraging, and for some reason, our last few batches of birds wanted nothing to do with fruit and veggies.
Since the girls did meat birds in 4-H last year, their cost was about $3 a bird to raise. That’s pretty good, considering. I also did a video on TikTok about the cost of raising meat birds.
We use a chicken tractor for our meat birds, and they will peck at the grass, but more likely they are stepping it down and pooping all over it that you need to move it.
If you are raising the birds in warmer weather, they tend to get dehydrated quickly. I use apple cider vinegar for all the animals on our farm, including our meat birds. When you get Apple cider vinegar, ensure you get the good stuff with the chunks. Go for organic, and if it doesn’t have chunks skip it. I get Vermont Village Apple Cider Vinegar at BJ’s for cheap. ( It’s only $9.99 for two huge bottles)
I add one teaspoon of Apple Cider Vinegar to a gallon waterer. I’ll add it once a week if it’s hot out.
You can gut a chicken with only four supplies: a butcher knife, a hatchet, a hose, and a bucket. Most will use a kill cone you can buy right on Amazon.
This is what we did for the first two years, and then we scored a deal on a Turkey fryer and found this cut down the time of plucking. If you are a canner, you could use a big pot of water like a canner to put your bird in.
If it’s your first time, you will notice a slight smell; it didn’t bother my husband, but if it bothers you, add a couple of small squirts of dish soap. Honestly, though, you don’t need it. You got this.
I like the Turkey fryer because it can be outside.
You will need a clean work surface. We used to use stainless steel, but we had an extra piece of the countertop, so we used that. Clean the surface before use.
The Kill
This will likely be the most challenging part for anyone for the first time. My husband handles this part on our farm. Many people use a kill cone to hold the chicken securely upside down, then cut the neck with a sharp knife to sever the arteries.
We don’t have a kill cone, so we use the old-fashioned stump and hatchet method. A well-aimed swing will do the job as quickly as the cone method. My husband says the best way is to swing hard, don’t miss, and make a clean cut.
The most humane ways to slaughter chickens, they say, is the cone, but again we use what we have and live for practicality, so you will have to do what’s best for you and your homestead.
We saw another homesteader use a stick with a split to hold the head slightly more steady and loved that idea. Costs nothing.
Processing our Chicken or Gutting a Chicken
If butchering a chicken for the first time is intimidating, trust me, if we can do it, you can. Well, mostly, if I can do it, you can do it.
The worst part for me is the actual gutting of the chicken. Oh man, but it was worth it when I think we could know what it ate and how it was raised and butchered.
When you dunk the bird in the turkey fryer, ensure you have hot water, and I mean boiling hot. Otherwise, the feathers won’t come off as easily.
If you aren’t using the hot water method, you will get a lot of little feathers sticking to your hand while you pluck.
After scalding, the feathers will easily peel off. You remove all the feathers.
To gut the bird, I suggest watching our video here.
It will cost more for you to take your chickens to a processing place, so we choose to do our own.
Saving money always drives us to give things a try we didn’t think we could.
How to Store Butchered Chickens
How Long Does it Take?
My husband can do the entire process in about 20 minutes once the scalding pot is up to a good temperature. But, of course, if you involve the kids or pluck a chicken, you will be more efficient. And trust me, you will get faster and faster each time you do it.
The Cornish Cross chickens do pluck easier than we did the Wyandottes without scalding. Once my husband, has the birds gutted and cleaned, I will bring the birds in. I’ll pluck any leftover feathers.
You can leave The tiny little ones if you can’t pluck another feather. I get it. When you cook it, remove it or don’t eat that part or eat it!
We salt the entire outside of the bird before we place it into the Food Saver bag. Before we purchased our amazing Food Saver, we used plastic wrap. The best brand I have ever found for our meat was at BJs called – Stretch Tite.
You can fit an entire bird into a food-saver bag. We use the rolls so we can cut our own length. You can see in the video we shared on YouTube how the bird fits and seals into the Foodsaver bags.
I’ll seal the birds up and let them rest in the fridge. We try to keep the birds in the fridge for 24 hours. You don’t want to when people joke about eating the bird for dinner that night.
The chicken meat will be tough. Think of it like processing a deer. The longer the meat hangs, the more tender and less game taste it has. The same goes for canning. The longer your pickles sit in the jar, the tastier they are.
I made a mistake and immediately forgot the last round of chickens we placed in the freezer. So I got a Ninja Foodi for Christmas and tried frozen chicken; here is how it turned out.
It feels incredible to have a freezer full of chicken! I’m so excited for you to have your own home-raised chicken. I think once you experience this, you won’t be going back to store-bought chicken anytime soon.
Ready to start raising egg layers? Check out the beginner’s guide here.
Wow, very interesting process. It is so much healthier to raise your own chickens. I would love to do this one day. To many hormones, steroids and other additives in store bought chickens, that are not healthy.
Looks like a great process. My cousin and her husband do chickens, ducks and turkeys they raise in the scalding pot to pluck them. They seem more eager to get their hands dirty. I hunt deer with a bow and rifle, rabbit, squirrel and have gutted, skinned and cooked up the meat. Delicious. My wife has hunted for deer, but her skills have not scored her any deer for the freezer. My concern is that my wife and step kids who have never killed any game will freak out kiiling the meat birds as they view them as pets. They collect eggs, fill feeders and water begrudgingly as too much work. Any tips to get them prepared?
It sounds like everything you are already doing they are going to be just fine. We don’t have the girls involved in the kill at all. They help pluck. Before we used the boiler we hand plucked all the chickens and the girls helped in the process. It comes with the life of a chicken and I think it is important to explain to them all the meat they see packaged at the store started like this on a farm.
Hi Tasia! I have recently just began my own homesteading journey and right now we have a flock of 15 layers, whom we adore and spoil lol. I live in Southwest Missouri and am planning on getting my first flock of meat birds at the end of January!!! I just found your blog a few days ago and I’m loving everything here! Do you have a preference on sex of your birds for meat, or does that even really matter? I was planning on trying for all hens. I’m so excited to give this a shot and your blog has given me more confidence in myself to do it!! I’ve been contemplating it since May haha.
Hi Kaelyn! That is so exciting. You can handle it ;). We always get a mix. I’ve never noticed a difference in the taste of meat of one verse the other. The Roosters can tend to be a little bit larger but that’s the only difference I see. With the meat breed the Roosters are so tame. I’m so glad you found the blog. Hope to hear from you again.
Aloha Lisa,
I have watched a few videos on this subject and one difference I saw with yours is that all the others quickly put the plucked and gutted bird in an ice chest filled with a lot of ice with a little water and none of them said anything about salting them before bagging of course all the other videos the people were blessed with an automatic chicken plucking machine. I am just wondering does it really make a difference? can you just wash them off and add salt the bag?
Mahalo,
Robin
I would imagine they are putting then in an ice bath because they are doing a lot of them at a time. We only do a few at a time for a couple days. I’m not sure it would make a difference, but I don’t seem the harm in it either. It made sense to use when researching to salt it, only because with everything else we preserve we add salt. You could probably add salt to the bag, but if you are doing that mine as well just salt the bird?
Great information! Just started a homestead last year and I just started processing my roosters last week. I was hoping to wait until this coming fall but had too many roosters and they were ganging up on the hens and hurting them. I did purchase a plucker and love it. I was wondering why you salt your birds before freezing? I do the 24 hr resting period, vacuum seal and freeze. So just curious if it’s something I need to do.
We just salt it as part of the curing process, I don’t think you have to. We also found that if you have older roosters or hens grinding up the meat works really well too. And then you can skip plucking!
I am sorry lol I watched the video and have butchered chickens and ducks but I just can’t do my own , someone else’s no problem but mine get to be like family pets and we have become so attached to them that killing is out of the question, my comment is on the food saver, I have also used the food saver to Preserve food and vegetables and the cost is way to high I recommend saran Wrap we have done our own deer , hogs and poultry for years and you can’t go wrong with a industrial size roll of
Saran Wrap the cost of the roll will pay for it self just with one roll of vac bags :-).
Hi there, I was wondering if there is a time limit between killing and gutting? I have heard alot of old wives tales but nothing certain. Do you have an idea?
I would love a tool like your husband uses in this video to help with the scalding process of the birds. He uses it to push the body down under the water and uses a hooked end to grab a foot. Did he make this or purchase it? Can you give me more info on it?
Btw, Loved the video & your site….thank you


 Why Stockpiling is The Smartest Way to Save Money on Groceries
Wow, very interesting process. It is so much healthier to raise your own chickens. I would love to do this one day. To many hormones, steroids and other additives in store bought chickens, that are not healthy.
Nothing like fresh Chicken! I wish we could have chickens but our HOA would frown upon it LOL
Looks like a great process. My cousin and her husband do chickens, ducks and turkeys they raise in the scalding pot to pluck them. They seem more eager to get their hands dirty. I hunt deer with a bow and rifle, rabbit, squirrel and have gutted, skinned and cooked up the meat. Delicious. My wife has hunted for deer, but her skills have not scored her any deer for the freezer. My concern is that my wife and step kids who have never killed any game will freak out kiiling the meat birds as they view them as pets. They collect eggs, fill feeders and water begrudgingly as too much work. Any tips to get them prepared?
It sounds like everything you are already doing they are going to be just fine. We don’t have the girls involved in the kill at all. They help pluck. Before we used the boiler we hand plucked all the chickens and the girls helped in the process. It comes with the life of a chicken and I think it is important to explain to them all the meat they see packaged at the store started like this on a farm.
Hi Tasia! I have recently just began my own homesteading journey and right now we have a flock of 15 layers, whom we adore and spoil lol. I live in Southwest Missouri and am planning on getting my first flock of meat birds at the end of January!!! I just found your blog a few days ago and I’m loving everything here! Do you have a preference on sex of your birds for meat, or does that even really matter? I was planning on trying for all hens. I’m so excited to give this a shot and your blog has given me more confidence in myself to do it!! I’ve been contemplating it since May haha.
Hi Kaelyn! That is so exciting. You can handle it ;). We always get a mix. I’ve never noticed a difference in the taste of meat of one verse the other. The Roosters can tend to be a little bit larger but that’s the only difference I see. With the meat breed the Roosters are so tame. I’m so glad you found the blog. Hope to hear from you again.
Could you break down the chicken before freezing it? If so, when? As soon as they are gutted or after the 24 hours in the fridge?
Yes some of the birds we will cut up into breasts, thighs etc. We do it before packaging.
Aloha Lisa,
I have watched a few videos on this subject and one difference I saw with yours is that all the others quickly put the plucked and gutted bird in an ice chest filled with a lot of ice with a little water and none of them said anything about salting them before bagging of course all the other videos the people were blessed with an automatic chicken plucking machine. I am just wondering does it really make a difference? can you just wash them off and add salt the bag?
Mahalo,
Robin
I would imagine they are putting then in an ice bath because they are doing a lot of them at a time. We only do a few at a time for a couple days. I’m not sure it would make a difference, but I don’t seem the harm in it either. It made sense to use when researching to salt it, only because with everything else we preserve we add salt. You could probably add salt to the bag, but if you are doing that mine as well just salt the bird?
Need a the chicken plucker..I got one and it saves a ton of time with feathers..
Thank you for your video our roosters have been flogging our chihuahua puppies so I’m going to eat them, that will show the mother f*****
Great information! Just started a homestead last year and I just started processing my roosters last week. I was hoping to wait until this coming fall but had too many roosters and they were ganging up on the hens and hurting them. I did purchase a plucker and love it. I was wondering why you salt your birds before freezing? I do the 24 hr resting period, vacuum seal and freeze. So just curious if it’s something I need to do.
We just salt it as part of the curing process, I don’t think you have to. We also found that if you have older roosters or hens grinding up the meat works really well too. And then you can skip plucking!
I am sorry lol I watched the video and have butchered chickens and ducks but I just can’t do my own , someone else’s no problem but mine get to be like family pets and we have become so attached to them that killing is out of the question, my comment is on the food saver, I have also used the food saver to Preserve food and vegetables and the cost is way to high I recommend saran Wrap we have done our own deer , hogs and poultry for years and you can’t go wrong with a industrial size roll of
Saran Wrap the cost of the roll will pay for it self just with one roll of vac bags :-).
Hi there, I was wondering if there is a time limit between killing and gutting? I have heard alot of old wives tales but nothing certain. Do you have an idea?
I don’t know for sure, but we starting gutting right away.
I would love a tool like your husband uses in this video to help with the scalding process of the birds. He uses it to push the body down under the water and uses a hooked end to grab a foot. Did he make this or purchase it? Can you give me more info on it?
Btw, Loved the video & your site….thank you