
If you are thinking about dehydrating apples this year in your Ninja Foodi, let me tell you it’s fantastic. I’ve used our classic dehydrator system like this for years.
This is our second one as I’ve noticed the heating element seems to give out in time.
When I used this dehydrator, it took all night and a few more hours early in the morning. So, I was waiting for a total of 11+ hours.

I am living out here in the country with many old apple trees. I hate to see them go to waste. This year has been fantastic for apples; we have six apple trees. So applesauce and using the Ninja Foodi is a great way to use up the apples. Although our pigs, goats, and sheep love them as well.
So, I decided to use my Ninja Foodi to make a healthy snack for my family. Another perk of doing this is keeping with our $60 grocery shopping budget.
I’ve been sharing my Ninja Foodi posts here if you are new. I did a complete review of it here. I couldn’t be more impressed with this machine, it’s become my best friend. I almost love it MORE than my Kitchenaid mixer, which is my first true love.
This is such an easy way to dehydrate apples. It’s one of my favorite cheap snacks to make for the kids.

How to Make Dehydrated Apples in the Ninja Foodi
Items Needed:
- Lemon Juice- I used 2 tsp.
- 3 Apples- I used Medium Sized Apples 2 sour 1 gala
- Knife or Apple Slicer/Corer- I used this apple slicer and corer and slice the apples in half from it.
- Peeler
- Cinnamon- optional
Let’s Move On To How to Prep The Apples
I’ve tried the classic apple peeler in the past, and it works great at first. Then it becomes a pain in the butt. After spending money on two different ones, I stick to the apple slicer and corer.
We do not spray our apples; if you have your apple trees, you may notice they don’t look like the store ones. Our apple trees are OLD, and we are slowly trimming them each year. We did plant three new apple trees that after three years, are starting to get a decent harvest.
But I assure you they taste just as good when you cook with them.

You will want to wash your apples first. Then, you can core and slice your fruit into thin pieces. I cut the apples in half again with the apple slicer like this. You will want to slice your fruit in different ways depending on your preference.
The ones below are thicker and depend on whether you want a crisp apple like a chip or a slightly chewy texture. The chewier, the thicker, the more chip-like than thin slices.

I also peel them by hand. Of course, my kids will eat the apples how they are now, but I thought it would be easier to peel the skin off if they decide it’s too chewy or crazy.

I recommend getting a peeler that has a double edge. It works fast, and it’s sharp! Be careful if you get a brand new one not to cut yourself.
Check for any edges that have part of the core, etc., left. Cut that off. I always run my finger along the top to ensure it doesn’t have any complex pieces left.
Are you tired of looking at the Ninja Foodi on your counter? Check out these cute Food Cover-ups.

I put all my apple slices in a bowl and added 2 tsp of Lemon Juice. I wooshed them around for a few minutes. You want to make sure every piece is coated in lemon juice.
I did one apple with the peel and the other two without. This is because I like to test out what my kids will eat.
Be sure to save all your peels and cores for your compost pile and your animals.

I grabbed a paper towel and laid the sliced apples out on it.

Pat dry the apples to remove access juice.

Get your Ninja Foodi ready. Mine came with this rack, which is perfect for drying more apples. If you have a Foodi, you know it is on the small side of specific meals. The stand gives you extra space.

I learned that you don’t want to fill it up entirely the hard way. Place the apples in an even single layer on your dehydrator trays.
You need room for the air to flow and dry the apples properly.
Before I bought my dehydrator racks for the Ninja Foodi, I used the rack for the air fryer that came with it. I 100% recommend buying the dehydrating racks because you can fit a lot more. The racks are the ones with the squares.

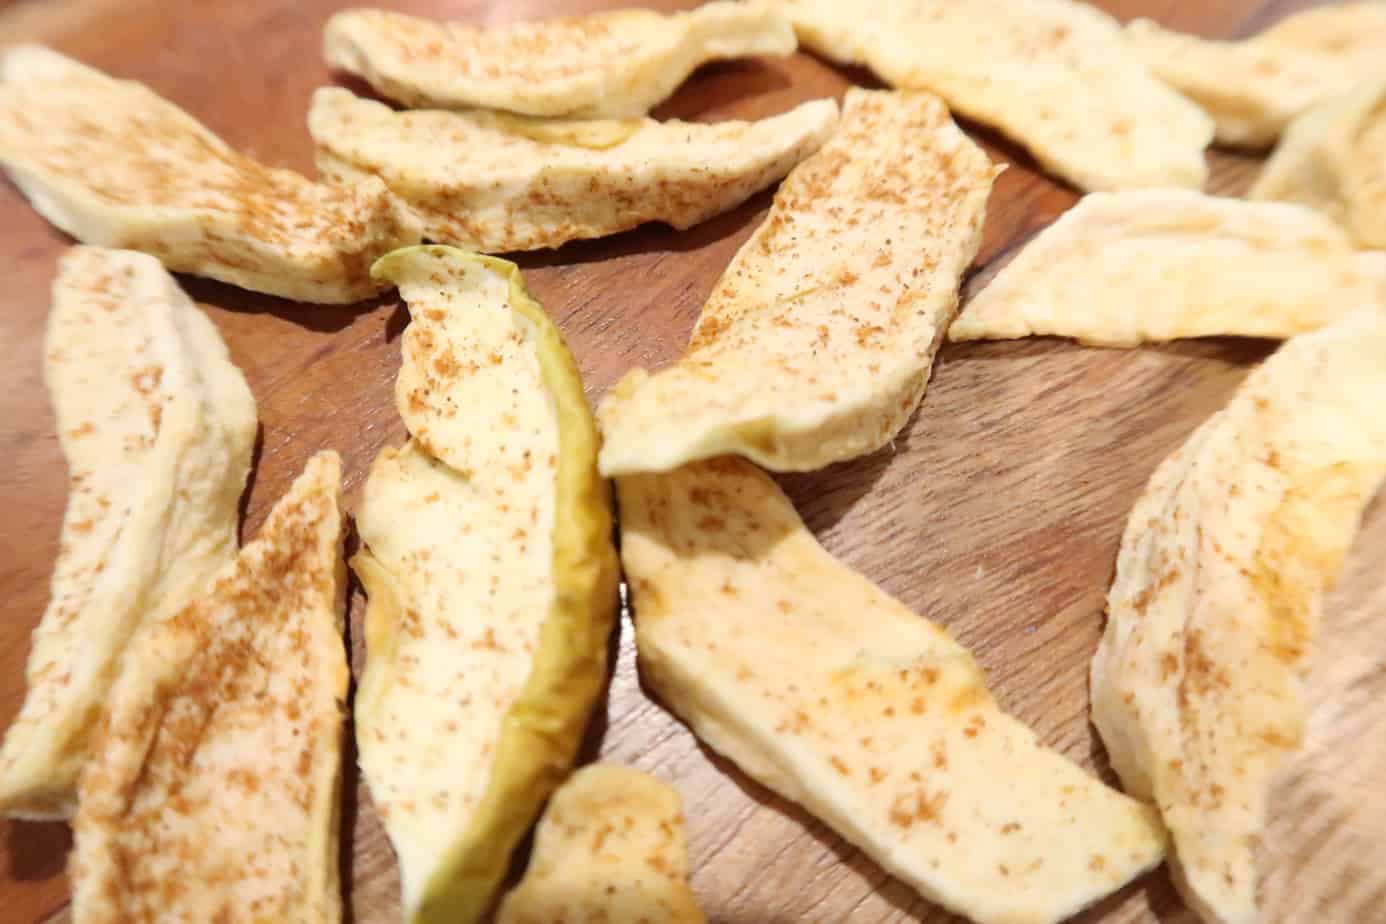
The last thing I did was sprinkle cinnamon on sliced apples. I love the Saigon Organic Cinnamon from BJs. You can’t beat the price.

This was my first time doing it in the Ninja Foodi, so I left room between the apple slices.

I’ve done this multiple times, and you can also slice the apples into circles or your own ways.
I like both ways and change it up. I experimented recently with the apples in the Ninja Foodi vs. my traditional dehydrator and I preferred the taste of the Ninja Foodi.
The perk of the other dehydrators is that you can do a bigger batch of apples or other foods.

More Ninja Foodi Stuff:
- Easy Restaurant Quality Ninja Foodi Yeast Rolls
- Upside Down Taco Nachos in the Ninja Foodi
- Easy Chocolate Chip Skillet Cookie in Ninja Foodi
- Easy Way to Make Hot Dogs in Ninja Foodi
- 33 Easy Pantry Staple Meals You Can Make For Cheap
Ninja Foodi Settings
I put my apples on the bottom and top. Closed the air fryer lid.
I hit the dehydrate button and set the temperature to 150° and eight hours.
The best part about this is after seven hours, it shuts off. I woke up to dried apples that the Ninja Foodi perfectly did.
Results

I love how these turned out. They taste delicious. Eight hours may seem long, but this was a welcome hello from my traditional dehydrator. I love how it turns off after setting the time.

I put ours in a Ziploc bag because they probably won’t last more than a day. Since it is a small serving, you could have fresh apple slices daily during apple season.
After baking multiple pies and apple crisp, I’m ready to only peel and core three apples for a snack 🙂
My kids liked these, too. Ours is a tad bit sour because I didn’t add any sugar, making me like them even more. I love sour stuff. In t e next batch, I’ll add a tiny bit of sugar.
If you want your apples to be more of a chip texture, slice thinner or in circles and dehydrate an hour or so longer.
Give them a try in your Foodi, and let me know how it goes in the comments below. Or connect by email below.
Ninja Foodi Dried Apples

Ingredients
- 2 Tsp Lemon Juice
- 3 Apples- I used Medium Sized Apples 2 sour 1 gala
- Knife or Apple Slicer/Corer
- Cinnamon- optional sprinkle on to your liking
Instructions
- Core and slice your apples. If your kids are picky with skins you can remove those. Slice your apples straight down for chips in half for thicker slices.
- Add sliced apples to the bowl with the lemon juice. I add the apples as I cut because homegrown apples will turn brown quicker than store-bought.
- After all apples are sliced pat dry on a paper towel.
- Sprinkle with cinnamon if preferred.
- Using the dehydrator racks or wire racks of the Ninja Foodi, place at least one in the pot of the Ninja Foodi.
- Place your apple slices evenly as possible on the rack.
- Close your Ninja Foodi Lid and hit the dehydrate button
- Set the temperature to 135 degrees for eight hours.
- Afterwards, place in airtight container.
Notes
If you do it at night and your time goes off at let's say, 3 a.m. they will be okay to sit until you wake up. Then you can store them right away because you don't have to wait for them to get to room temperature.
Nutrition Information:
Yield:
6Serving Size:
1Amount Per Serving: Calories: 97Total Fat: 0gSaturated Fat: 0gTrans Fat: 0gUnsaturated Fat: 0gCholesterol: 0mgSodium: 2mgCarbohydrates: 25gFiber: 5gSugar: 19gProtein: 1g
PIN OR SAVE FOR LATER NINJA FOODI RECIPES:
- Easy Venison Roast with Veggies Recipe in Foodi Ninja
- How to Cook a Whole Chicken in Ninja Foodi
- Easy & Delicious Pizza Pasta Bake in Ninja Foodi
- Ninja Foodi Mac & Cheese Recipe
- Healthy Vegetarian Lasagna In Ninja Foodi
,
Wow, dehydrated fruits are great and healthily. Looks easy too
Looks delicious will any apple work well or should I use a sour apple like Granny Smith?
You can use any apple. If you want a sweeter apple I would go for Gala or Fuji. We used the apples we had available for free. Granny smith are good if you don’t want a very sweet dried apple.
I bought the 5 layer rack and placed thin slices on all 5 layers.
Set the 6.5L Foodi for 10 hours and ran over night. Awoke to crispy and delicious apple chips.
We tried the sweet potato chips but they wont dry to crispy. Loving the Foodi.
Thank you for the cinnamon tip! 🙂 cheers stay safe
Awesome glad to hear it! I can’t wait for apples again this year.
Newbie dehydrator here.-To use these in a pie, how would I go about that? As in rehydrating them?
Hey Angel. I haven’t personally used dried apples in a pie, but here is how you can go about doing it. Heat juice or cider to a boil and pour over dried apples; let stand for 1 hour. Cook apples in juice for 10 to 15 minutes or till tender. Then you can follow the rest of your pie recipe as normal.
Why would you use dehydrated fruit in a pie? I don’t think that’s going to work. Pies need the juice in the fresh apples.
hi Tasia , I’ve just received my Foodi and will be trialling some of your recipes! Quick question ondehydrating – can the dehydrated fruit pieces be frozen afterwards? thankyou! Mark, England
I personally haven’t done that, but I know you can certainly store dried fruit in the freezer. Excited for you with the Ninja Foodi journey.
Thanks for the detailed instructions! I don’t see a dehydrator setting on my ninja foodi. Could it be called something else? Would it be the air fryer setting? TIA!
Yours may not have it then. Mine has the actual dehydrator button. 🙁